Section I. DESCRIPTION
6-1. GENERAL
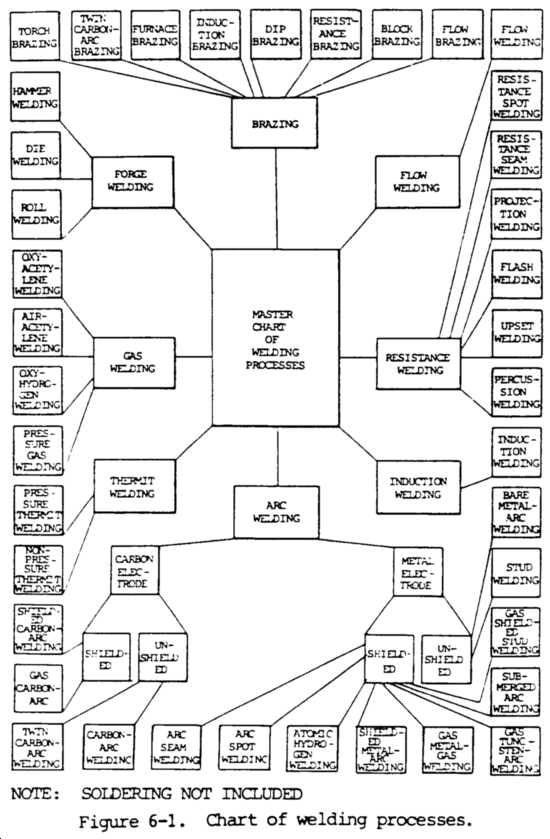
The purpose of this chapter is to outline the various techniques used in welding processes. Welding processes may be broken down into many categories. Various methods and materials may be used to accomplish good welding practices. Common methods of welding used in modern metal fabrication and repair are shown in figure 6-1.
6-2. ARC WELDINGThe term arc welding applies to a large and varied group of processes that use an electric arc as the source of heat to melt and join metals. In arc welding processes, the joining of metals, or weld, is produced by the extreme heat of an electric arc drawn between an electrode and the workpiece, or between two electrodes. The formation of a joint between metals being arc welded may or may not require the use of pressure or filler metal. The arc is struck between the workpiece and an electrode that is mechanically or manually moved along the joint, or that remains stationary while the workpiece is roved underneath it. The electrode will be either a consumable wire rod or a nonconsumable carbon or tungsten rod which carries the current and sustains the electric arc between its tip and the workpiece. When a nonconsumable electrode is used, a separate rod or wire can supply filler material, if needed. A consumable electrode is specially prepared so that it not only conducts the current and sustains the arc, but also melts and supplies filler metal to the joint, and may produce a slag covering as well.
a. Metal Electrodes. In bare metal-arc welding, the arc is drawn between a bare or lightly coated consumable electrode and the workpiece. Filler metal is obtained from the electrode, and neither shielding nor pressure is used. This type of welding electrode is rarely used, however, because of its low strength, brittleness, and difficulty in controlling the arc.
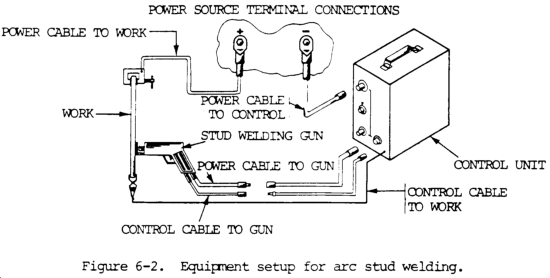
(1) Stud welding. The stud welding process produces a joining of metals by heating them with an arc drawn between a metal stud, or similar part, and the workpiece. The molten surfaces to be joined, when properly heated, are forced together under pressure. No shielding gas is used. The most common materials welded with the arc stud weld process are low carbon steel, stainless steel, and aluminum. Figure 6-2 shows a typical equipment setup for arc stud welding.
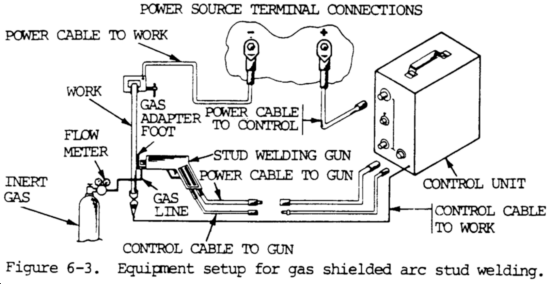
(2) Gas shielded stud welding. This process, a variation of stud welding, is basically the same as that used for stud welding, except that an inert gas or flux, such as argon or helium, is used for shielding. Shielding gases and fluxes are used when welding nonferrous metals such as aluminum and magnesium. Figure 6-3 shows a typical setup for gas shielded arc stud welding.
(3) Submerged arc welding. This process joins metals by heating them with an arc maintained between a bare metal electrode and the workpiece. The arc is shielded by a blanket of granular fusible material and the workpiece. Pressure is not used and filler metal is obtained from the electrode or from a supplementary welding rod. Submerged arc welding is distinguished from other arc welding processes by the granular material that covers the welding area. This granular material is called a flux, although it performs several other important functions. It is responsible for the high deposition rates and weld quality that characterize the submerged arc welding process in joining and surfacing applications. Basically, in submerged arc welding, the end of a continuous bare wire electrode is inserted into a mound of flux that covers the area or joint to be welded. An arc is initiated, causing the base metal, electrode, and flux in the immediate vicinity to melt. The electrode is advanced in the direction of welding and mechanically fed into the arc, while flux is steadily added. The melted base metal and filler metal flow together to form a molten pool in the joint. At the same time, the melted flux floats to the surface to form a protective slag cover. Figure 6-4 shows the submerged arc welding process.
(4) Gas tungsten-arc welding (TIG welding or GTAW). The arc is drawn between a nonconsumable tungsten electrode and the workpiece. Shielding is obtained from an inert gas or gas mixture. Pressure and/or filler metal may or may not be used. The arc fuses the metal being welded as well as filler metal, if used. The shield gas protects the electrode and weld pool and provides the required arc characteristics. A variety of tungsten electrodes are used with the process. The electrode is normally ground to a point or truncated cone configuration to minimize arc wandering. The operation of typical gas shielded arc welding machines may be found in TM 5-3431-211-15 and TM 5-3431-313-15. Figure 6-5 shows the relative position of the torch, arc, tungsten electrode, gas shield, and the welding rod (wire) as it is being fed into the arc and weld pool.
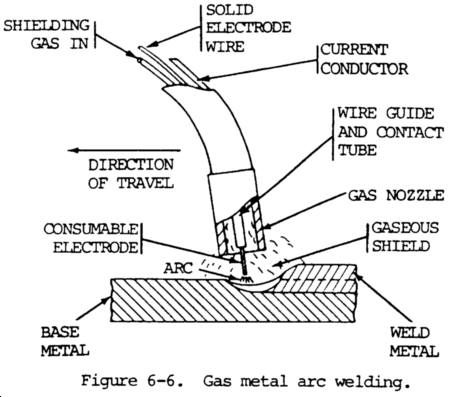
(5) Gas metal-arc Welding (MIG welding or GMAW). In this process, coalescence is produced by heating metals with an arc between a continuous filler metal (consumable) electrode and the workpiece. The arc, electrode tip and molten weld metal are shielded from the atmosphere by a gas. Shielding is obtained entirely from an externally supplied inert gas, gas mixture, or a mixture o f a gas and a flux. The electrode wire for MIG welding is continuously fed into the arc and deposited as weld metal. Electrodes used for MIG welding are quite small in diameter compared to those used in other types of welding. Wire diameters 0.05 to 0.06 in. (0.13 to 0.15 cm) are average. Because of the small sizes of the electrode and high currents used in MIG welding, the melting rates of the electrodes are very high. Electrodes must always be provided as long, continuous strands of tempered wire that can be fed continuously through the welding equipment. Since the small electrodes have a high surface-to-volume ratio, they should be clean and free of contaminants which may cause weld defects such as porosity and cracking. Figure 6-6 shows the gas metal arc welding process. All commercially important metals such as carbon steel, stainless steel, aluminum, and copper can be welded with this process in all positions by choosing the appropriate shielding gas, electrode, and welding conditions.
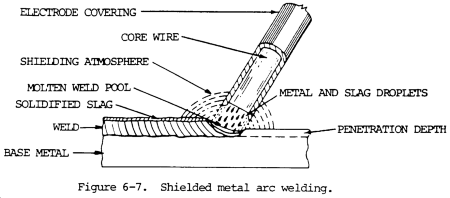
(6) Shielded metal-arc welding. The arc is drawn between a covered consumable metal electrode and workpiece. The electrode covering is a source of arc stabilizers, gases to exclude air, metals to alloy the weld, and slags to support and protect the weld. Shielding is obtained from the decomposition of the electrode covering. Pressure is not used and filler metal is obtained from the electrode. Shielded metal arc welding electrodes are available to weld carbon and low alloy steels; stainless steels; cast iron; aluminum, copper, and nickel, and their alloys. Figure 6-7 describes the shielded metal arc welding process.
(7) Atomic hydrogen welding. The arc is maintained between two metal electrodes in an atmosphere of hydrogen. Shielding is obtained from the hydrogen. Pressure and/or filler metal may or may not be used. Although the process has limited industrial use today, atomic hydrogen welding is used to weld hard-to-weld metals, such as chrome, nickel, molybdenum steels, Inconel, Monel, and stainless steel. Its main application is tool and die repair welding and for the manufacture of steel alloy chain.
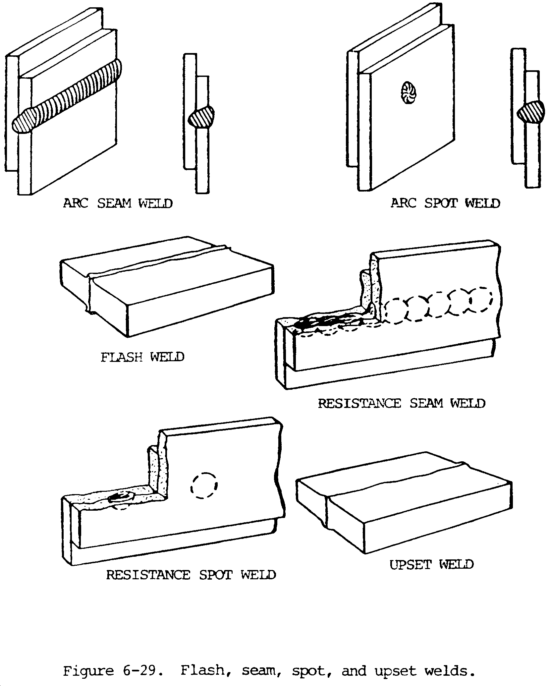
(8) Arc spot welding. An arc spot weld is a spot weld made by an arc welding process. A weld is made in one spot by drawing the arc between the electrode and workpiece. The weld is made without preparing a hole in either member. Filler metal, shielding gas, or flux may or may not be used. Gas tungsten arc welding and gas metal arc welding are the processes most commonly used to make arc spot welds. However, flux-cored arc welding and shielded metal arc welding using covered electrodes can be used for making arc spot welds.
(9) Arc seam welding. A continuous weld is made along faying surfaces by drawing the arc between an electrode and workpiece. Filler metal, shielding gas, or flux may or may not be used.
b. Carbon Electrode.
(1) Carbon-arc welding. In this process, the arc is drawn between electrode and the workpiece. No shielding is use. Pressure and/or filler metal may or may not be used. Two types of electrodes are used for carbon arc welding: The pure graphite electrode does not erode away as quickly as the carbon electrode, but is more expensive and more fragile.
(2) Twin carbon-arc welding. In this variation on carbon-arc welding, the arc is drawn between two carbon electrodes. When the two carbon electrodes are brought together, the arc is struck and established between them. The angle of the electrodes provides an arc that forms in front of the apex angle and fans out as a soft source of concentrated heat or arc flame, softer than a single carbon arc. Shielding and pressure are not used. Filler metal may or may not be used. The twin carbon-arc welding process can also be used for brazing.
(3) Gas-carbon arc welding. This process is also a variation of carbon arc welding, except shielding by inert gas or gas mixture is used. The arc is drawn between a carbon electrode and the workpiece. Shielding is obtained from an inert gas or gas mixture. Pressure and/or filler metal may or may not be used.
(4) Shielded carbon-arc welding. In this carbon-arc variation, the arc is drawn between a carbon electrode and the workpiece. Shielding is obtained from the combustion of a solid material fed into the arc, or from a blanket of flux on the arc, or both. Pressure and/or filler metal may or may not be used.
6-3. GAS WELDING
Gas welding processes are a group of welding processes in which a weld is made by heating with a gas flame or flares. Pressure and/or filler metal may or may not be used. Also referred to as oxyfuel gas welding, the term gas welding is used to describe any welding process that uses a fuel gas combined with oxygen, or in rare cases, with air, to produce a flame having sufficient energy to melt the base metal. The fuel gas and oxygen are mixed in the proper proportions in a chamber, which is generally a part of the welding tip assembly. The torch is designed to give the welder complete control of the welding flare, allowing the welder to regulate the melting of the base metal and the filler metal. The molten metal from the plate edges and the filler metal intermix in a common molten pool and join upon cooling to form one continuous piece. Manual welding methods are generally used.Acetylene was originally used as the fuel gas in oxyfuel gas welding, but other gases, such as MAPP gas, have also been used. The flames must provide high localized energy to produce and sustain a molten pool. The flames can also supply a protective reducing atmosphere over the molten metal pool which is maintained during welding. Hydrocarbon fuel gases such as propane, butane, and natural gas are not suitable for welding ferrous materials because the heat output of the primary flame is too low for concentrated heat transfer, or the flame atmosphere is too oxidizing. Gas welding processes are outlined below.
a. Pressure Gas Welding. In this process, a weld is made simultaneously over the entire area of abutting surfaces with gas flames obtained from the combustion of a fuel gas with oxygen and the application of pressure. No filler metal is used. Acetylene is normally used as a fuel gas in pressure gas welding. Pressure gas welding has limited uses because of its low flame temperature, but is extensively used for welding lead.
b. Oxy-Hydrogen Welding. In this process, heat is obtained from the combustion of hydrogen with oxygen. No pressure is used, and filler metal may or may not be used. Hydrogen has a maximum flame temperature of 4820°F (2660°C), but has limited use in oxyfuel gas welding because of its colorless flare, which makes adjustment of the hydrogen-oxygen ratio difficult. This process is used primarily for welding low melting point metals such as lead, light gage sections, and small parts.
c. Air-Acetylene Welding. In this process, heat is obtained from the combustion of acetylene with air. No pressure is used, and filler metal may or may not be used. This process is used extensively for soldering and brazing of copper pipe.
d. Oxy-Acetylene Welding. In this process, heat is obtained from the combustion of acetylene with oxygen. Pressure and/or filler metal may or may not be used. This process produces the hottest flame and is currently the most widely used fuel for gas welding.
e. Gas Welding with MAPP Gas. Standard acetylene gages, torches, and welding tips usually work well with MAPP gas. A neutral MAPP gas flame has a primary cone about 1 1/2 to 2 times as long as the primary acetylene flame. A MAPP gas carburizing flame will look similar to a carburizing acetylene flame will look like the short, intense blue flame of the neutral flame acetylene flame. The neutral MAPP gas flame very deep blue
6-4. BRAZING.
Brazing is a group of welding processes in which materials are joined by heating to a suitable temperature and by using a filler metal with a melting point above 840°F (449°C), but below that of the base metal. The filler metal is distributed to the closely fitted surfaces of the joint by capillary action. The various brazing processes are described below.
a. Torch Brazing (TB). Torch brazing is performed by heating the parts to be brazed with an oxyfuel gas torch or torches. Depending upon the temperature and the amount of heat required, the fuel gas may be burned with air, compressed air, or oxygen. Brazing filler metal may be preplaced at the joint or fed from handheld filler metal. Cleaning and fluxing are necessary. Automated TB machines use preplaced fluxes and preplaced filler metal in paste, wire, or shim form. For manual torch brazing, the torch may be equipped with a single tip, either single or multiple flame.
b. Twin Carbon-Arc Brazing. In this process, an arc is maintained between two carbon electrodes to produce the heat necessary for welding.
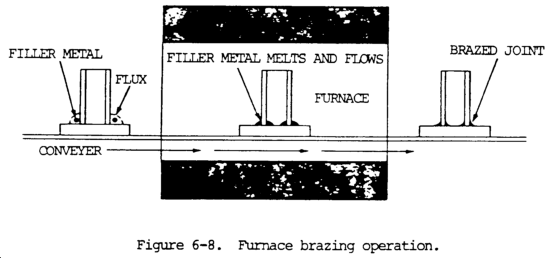
c. Furnace Brazing. In this process, a furnace produces the heat necessary for welding. In furnace brazing, the flame does not contact the workpiece. Furnace brazing is used extensively where the parts to be brazed can be assembled with the filler metal preplaced near or in the joint. brazing operation. Figure 6-8 illustrates a furnace
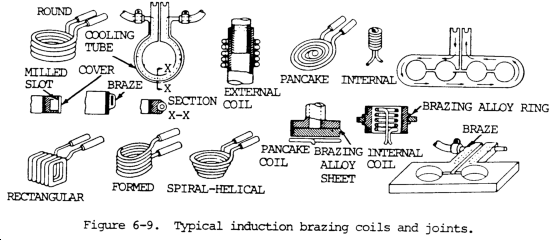
d. Induction Brazing. In this process, the workpiece acts as a short circuit in the flow of an induced high frequency electrical current. The heat is obtained from the resistance of the workpiece to the current. Once heated in this manner, brazing can begin. Three common sources of high frequency electric current used for induction brazing are the motor-generator, resonant spark gap, and vacuum tube oscillator. For induction brazing, the parts are placed in or near a water-cooled coil carrying alternating current. Careful design of the joint and the coil are required to assure the surfaces of all members of the joint reach the brazing temperature at the same time. Typical coil designs are shown in figure 6-9.
e. Dip Brazing. There are two methods of dip brazing: chemical bath and molten metal bath. In chemical bath dip brazing, the brazing fillermetal is preplaced and the assembly is immersed in a bath of molten salt, as shown in figure 6-10. The salt bath furnishes the heat necessary for brazing and usually provides the necessary protection from oxidation. The salt bath is contained in a metal or other suitable pot and heated. In molten metal bath dip brazing, the parts are immersed in a bath of molten brazing filler metal contained in a suitable pot. A cover of flux should be maintained over the molten bath to protect it from oxidation. Dip brazing is mainly used for joining small parts such as wires or narrow strips of metal. The ends of wires or parts must be held firmly together when removed from the bath until the brazing filler metal solidifies.
f. Resistance Brazing. The heat necessary for resistance brazing is obtained from the resistance to the flow of an electric current through the electrodes and the joint to be brazed. The parts of the joint are a part of the electrical current. Brazing is done by the use f a low-voltage, high-current transformer. The conductors or electrodes for this process are made of carbon, molybdenum, tungsten or steel. The parts to be brazed are held between two electrodes and the proper pressure and current are applied. Pressure should be maintained until the joint has solidified.
g. Block Brazing. In this process, heat is obtained from heated blocks applied to the part to be joined.
h. Flow Brazing. In flow brazing, heat is obtained from molten, nonferrous metal poured over the joint until the brazing temperature is obtained.
i. Infrared Brazing (IRB). Infared brazing uses a high intensity quartz lamp as a heat source. The process is suited to the brazing of very thin materials and is normally not used on sheets thicker than 0.50 in. (1.27 cm). brazed are supported in a position which enables radiant energy to be focused on the joint. The assembly and the lamps can be placed in an evacuated or controlled atmosphere. Figure 6-11 illustrates the equipment used for infrared brazing.
j. Diffusion Brazing (DFB). Unlike all of the previous brazing processes, diffusion brazing is not defined by its heat source, but by the mechanism involved. A joint is formed by holding the brazement at a suitable temperature for a sufficient time to allow mutual diffusion of the base and filler metals. The joint produced has a composition considerably different than either the filler metal or base metal, and no filler metal should be discernible in the finished microstructure. The DFB process produces stronger joints than the normal brazed joint. Also, the DFB joint remelts at temperatures approaching that of the base metal. The typical thickness of the base metals that are diffusion brazed range from very thin foil up to 1 to 2 in. (2.5 to 5.1 cm) thick. Much heavier parts can also be brazed since thickness has very little bearing on the process. Many parts that are difficult to braze by other processes can be diffusion brazed. Both butt and lap joints having superior mechanical properties can be produced, and the parts are usually fixtured mechanically or tack welded together. Although DFB requires a relatively long period of time (30 minutes to as long as 24 hours) to complete, it can produce many parts at the same time at a reasonable cost. Furnaces are most frequently used for this method of processing.
k. Special Processes.
(1) Blanket brazing is another process used for brazing. A blanket is resistance heated, and most of the heat is transferred to the parts by conduction and radiation. Radiation is responsible for the majority of the heat transfer.
(2) Exothemic brazing is another special process, by which the heat required to melt and flow a commercial filler metal is generated by a solid state exothermic chemical reaction. An exothermic chemical reaction is any reaction between two or more reactants in which heat is given off due to the free energy of the system. Exothermic brazing uses simple tooling and equipment. The process uses the reaction heat in bringing adjoining or nearby metal interfaces to a temperature where preplaced brazing filler metal will melt and wet the metal interface surfaces. The brazing filler metal can be a commercially available one having suitable melting and flow temperatures. The only limitations may be the thickness of the metal that must be heated through and the effects of this heat, or any previous heat treatment, on the metal properties.
6-5. RESISTANCE WELDING
Resistance welding consists of a group of processes in which the heat for welding is generated by the resistance to the electrical current flow through the parts being joined, using pressure. It is commonly used to weld two overlapping sheets or plates which may have different thicknesses. A pair of electrodes conducts electrical current through the sheets, forming a weld. The various resistance processes are outlined below.
a. Resistance Spot Welding. In resistance spot welding, the size and shape of the individually formed welds are limited primarily by the size and contour of the electrodes. The welding current is concentrated at the point of joining using cylindrical electrodes with spherical tips. The electrodes apply pressure.
b. Resistance Seam Welding. This weld is a series of overlapping spot welds made progressively along a joint by rotating the circular electrodes. Such welds are leaktight. A variation of this process is the roll spot weld, in which the spot spacing is increased so that the spots do not-overlap and the weld is not leaktight. In both processes, the electrodes apply pressure.
c. Projection Welding. These welds are localized at points predetermined by the design of the parts to be welded. The localization is usually accomplished by projections, embossments, or intersections. The electrodes apply pressure.
d. Flash Welding. In this process, heat is created at the joint by its resistance to the flow of the electric current, and the metal is heated above its melting point. Heat is also created by arcs at the interface. A force applied immediately following heating produces an expulsion of metal and the formation of a flash. The weld is made simultaneously over the entire area of abutting surfaces by the application of pressure after the heating is substantially completed.
e. Upset Welding. In this process, the weld is made either simultaneously over the entire area of two abutting surfaces, or progressively along a joint. Heat for welding is obtained from the resistance to the flow of electric current through the metal at the joint. Force is applied to upset the joint and start a weld when the metal reaches welding temperature. In some cases, force is applied before heating starts to bring the faying surfaces in contact. Pressure is maintained throughout the heating period.
f. Percussion Welding. This weld is made simultaneously over the entire area of abutting surfaces by the heat obtained from an arc. The arc is produced by a rapid discharge of electrical energy. It is extinguished by pressure applied percussively during the discharge.
g. High�Frequency Welding. High frequency welding includes those processes in which the joining of metals is produced by the heat generated from the electrical resistance of the workpiece to the flow of high-frequency current, with or without the application of an upsetting force. The two processes that utilize high-frequency current to produce the heat for welding are high-frequency resistance welding and high-frequency induction welding, sometimes called induction resistance welding. Almost all high-frequency welding techniques apply some force to bring the heated metals into close contact. During the application or force, an upset or bulging of metal occurs in the weld area.
6-6. THERMIT WELDING
a. Thermit welding (TW) is a process which joins metals by heating them with superheated liquid metal from a chemical reaction between a metal oxide and aluminum or other reducing agent, with or without the application of pressure. Filler metal is obtained from the liquid metal.
b. The heat for welding is obtained from an exothermic reaction or chemical change between iron oxide and aluminum. This reaction is shown by the following formula:
8A1 + 3fe304 = 9FE + 4A1203 + Heat
The temperature resulting from this reaction is approximately 4500°F (2482°C).
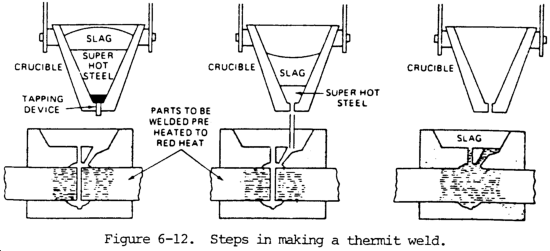
c. The superheated steel is contained in a crucible located immediately above the weld joint. The exothermic reaction is relatively slow and requires 20 to 30 seconds, regardless of the amount of chemicals involved. The parts to be welded are aligned with a gap between them. The superheated steel runs into a mold which is built around the parts to be welded. Since it is almost twice as hot as the melting temperature of the base metal, melting occurs at the edges of the joint and alloys with the molten steel from the crucible. Normal heat losses cause the mass of molten metal to solidify, coalescence occurs, and the weld is completed. If the parts to be welded are large, preheating within the mold cavity may be necessary to bring the pats to welding temperature and to dry out the mold. If the parts are small, preheating is often eliminated. The thermit welding process is applied only in the automatic mode. Once the reaction is started, it continues until completion.
d. Themit welding utilizes gravity, which causes the molten metal to fill the cavity between the parts being welded. It is very similar to the foundry practice of pouring a casting. The difference is the extremely high temperature of the molten metal. The making of a thermit weld is shown in figure 6-12. When the filler metal has cooled, all unwanted excess metal may be removed by oxygen cutting, machining, or grinding. The surface of the completed weld is usually sufficiently smooth and contoured so that it does not require additional metal finishing. Information on thermit welding equipment may be found in Section V of Chapter 5.
e. The amount of thermit is calculated to provide sufficient metal to produce the weld. The amount of steel produced by the reaction is approximately one-half the original quantity of thermit material by weight and one-third by volume.
f. The deposited weld metal is homogenous and quality is relatively high. Distortion is minimized since the weld is accomplished in one pass and since cooling is uniform across the entire weld cross section. There is normally shrinkage across the joint, but little or no angular distortion.
g. Welds can be made with the parts to be joined in almost any position as long as the cavity has vertical sides. If the cross-sectional area or thicknesses of the parts to be joined are quite large, the primary problem is to provide sufficient thermit metal to fill the cavity.
h. Thermit welds can also be used for welding nonferrous materials. The most popular uses of nonferrous thermit welding are the joining of copper and aluminum conductors for the electrical industry. In these cases, the exothermic reaction is a reduction of copper oxide by aluminum, which produces molten superheated copper. The high-temperature molten copper flows into the mold, melts the ends of the parts to be welded, and, as the metal cools, a solid homogenous weld results. In welding copper and aluminum cables, the molds are made of graphite and can be used over and over. When welding nonferrous materials, the parts to be joined must be extremely clean. A flux is normally applied to the joint prior to welding. Special kits are available that provide the molds for different sizes of cable and the premixed thermit material. This material also includes enough of the igniting material so that the exothermic reaction is started by means of a special lighter.
Section II. NOMENCLATURE OF THE WELD
6-7. GENERAL
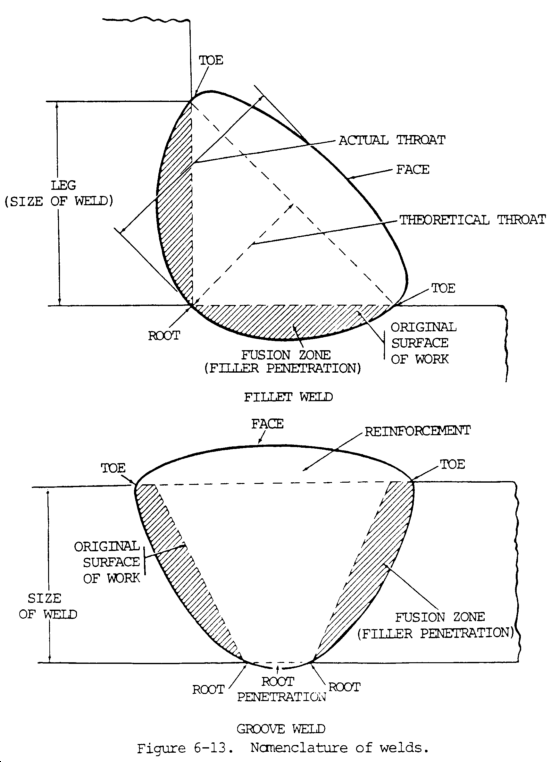
Common terms used to describe the various facets of the weld are explained in pargraphs 6-8 and 6-9 and are illustrated in figure 6-13.
6-8. SECTIONS OF A WELDa. Fusion Zone (Filler Penetration). The fusion zone is the area of base metal melted as determined in the cross section of a weld.
b. Leg of a Fillet Weld. The leg of a fillet weld is the distance from the root of the joint to the toe of the fillet weld. There are two legs in a fillet weld.
c. Root of the Weld. This is the point at which the bottom of the weld intersects the base metal surface, as shown in the cross section of weld.
d. Size of the Weld.
(1) Equal leg-length fillet welds. The size of the weld is designated by leg-length of the largest isosceles right triangle that can be scribed within the fillet weld cross section.
(2) Unequal leg-length fillet welds. The size of the weld is designated by the leg-length of the largest right triangle that can be inscribed within the fillet weld cross section.
(3) Groove weld. The size of the weld is the depth of chamfering plus the root penetration when specified.
e. Throat of a Fillet Weld.
(1) Theoretical throat. This is the perpendicular distance of the weld and the hypotenuse of the largest right triangle that can be inscribed within the fillet weld cross section.
(2) Actual throat. This is distance from the root of a fillet weld to the center of its face.
f. Face of the Weld. This is exposed surface of the weld, made by an arc or gas welding process on the side from which the welding was done.
g. Toe of the Weld. This is the junction between the face of the weld and the base metal.
h. Reinforcement of the Weld. This is the weld metal on the face of a groove weld in excess of the metal necessary for the specified weld size.
6-9. MULTIPASS WELDS
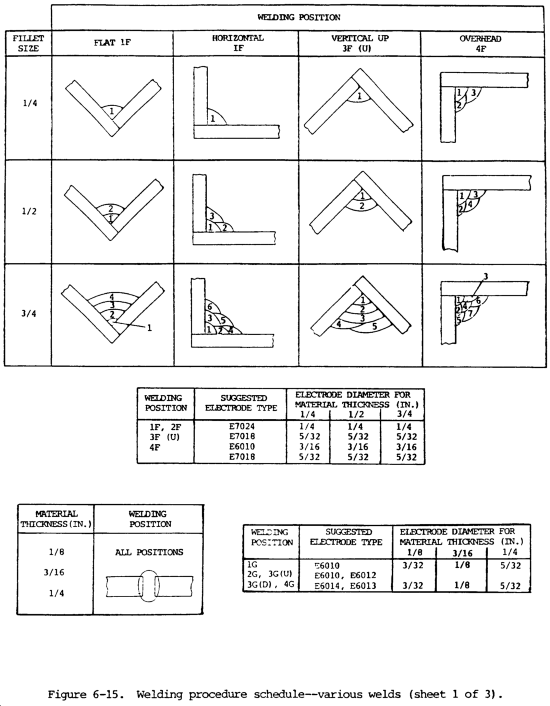
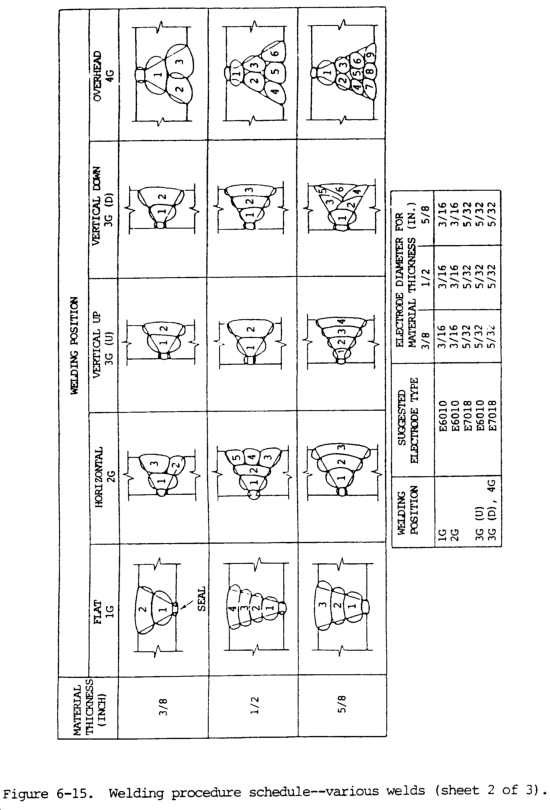
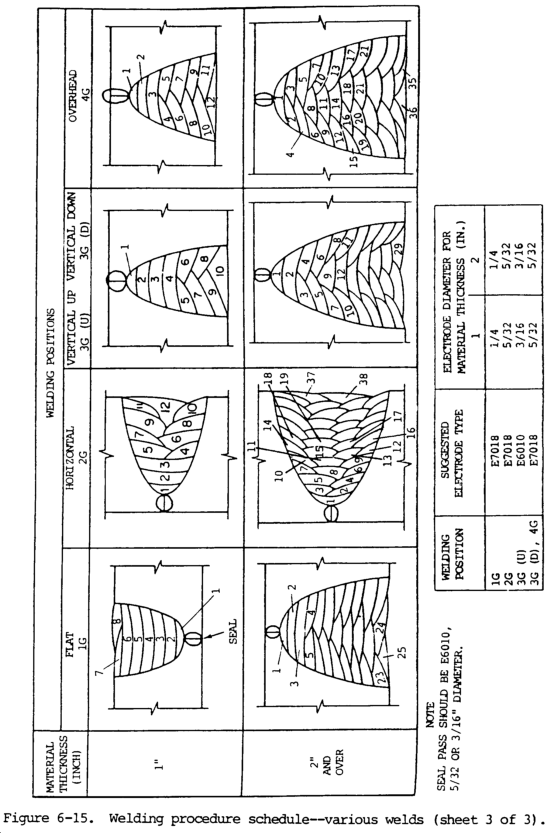
a. The nomenclature of the weld, the zones affected by the welding heat when a butt weld is made by more than one pass or layer, and the nomenclature applying to the grooves used in butt welding are shown in figure 6-14. Figure 6-15 is based on weld type and position.
b. The primary heat zone is the area fused or affected by heat in the first pass or application of weld metal. The secondary heat zone is the area affected in the second pass and overlaps the primary heat zone. The portion of base metal that hardens or changes its properties as a result of the welding heat in the primary zone is partly annealed or softened by the welding heat in the secondary zone. The weld metal in the first layer is also refined in structure by the welding heat of the second layer. The two heating conditions are important in determining the order or sequence in depositing weld metal in a particular joint design.
Section III. TYPES OF WELDS AND WELDED JOINTS
6-10. GENERAL
a. Welding is a materials joining process used in making welds. A weld is a localized coalescence of metals or nonmetals produced either by heating the materials to a suitable temperate with or without the application of pressure, or by the application of pressure alone, with or without the use of filler metal. Coalescence is a growing together or a growing into one body, and is used in all of the welding process definitions. A weldment is an assembly of component parts joined by welding, which can be made of many or few metal parts. A weldment may contain metals of different compositions, and the pieces may be in the form of rolled shapes, sheet, plate, pipe, forgings, or castings. To produce a usable structure or weldment, there must be weld joints between the various pieces that make the weldment. The joint is the junction of members or the edges of members which are to be joined or have been joined. Filler metal is the material to be added in making a welded, brazed, or soldered joint. Base metal is the material to be welded, soldered, or cut.
b. The properties of a welded joint depend partly on the correct preparation of the edges being welded. All mill scale, rust, oxides, and other impurities must be removed from the joint edges or surfaces to prevent their inclusion in the weld metal. The edges should be prepared to permit fusion without excessive melting. Care must be taken to keep heat loss due to radiation into the base metal from the weld to a minimum. A properly prepared joint will keep both expansion on heating and contraction on cooling to a minimum.
c. Preparation of the metal for welding depends upon the form, thickness, and kind of metal, the load the weld will be required to support, and the available means for preparing the edges to be joined.
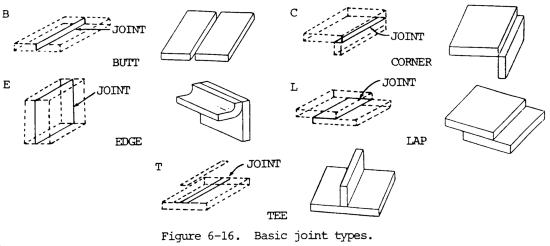
d. There are five basic types of joints for bringing two members together for welding. These joint types or designs are also used by other skilled trades. The five basic types of joints are described below and shown in figure 6-16.
(1) B, Butt joint - parts in approximately the same plane.
(2) C, Corner joint - parts at approximately right angles and at the edge of both parts.
(3) E, Edge joint - an edge of two or more parallel parts.
(4) L, Lap joint - between overlapping parts.
(5) T, T joint - parts at approximately right angles, not at the edge of one part.
6-11. BUTT JOINT
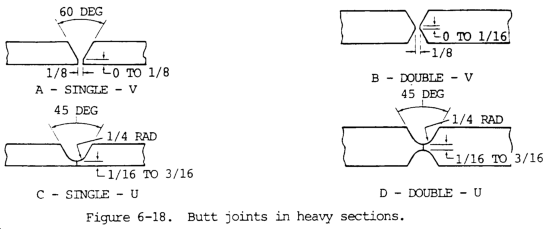
a. This type of joint is used to join the edges of two plates or surfaces located in approximately the same plane. Plane square butt joints in light sections are shown in figure 6-17. Grooved butt joints for heavy sections with several types of edge preparation are shown in figure 6-18. These edges can be prepared by flame cutting, shearing, flame grooving, machining, chipping, or carbon arc air cutting or gouging. The edge surfaces in each case must be free of oxides, scales, dirt, grease, or other foreign matter.
b. The square butt joints shown in figure 6-16 are used for butt welding light sheet metal. Plate thicknesses 3/8 to 1/2 in. (0.95 to 1.27 cm) can be welded using the single V or single U joints as shown in views A and C, figure 6-18. The edges of heavier sections (1/2 to 2 in. (1.27 to 5.08 cm)) are prepared as shown in view B, figure 6-18. Thickness of 3/4 in. (1.91 cm) and up are prepared as shown in view D, figure 6-18. The edges of heavier sections should be prepared as shown in views B and D, figure 6-18. The single U groove (view C, fig. 6-18) is more satisfactory and requires less filler metal than the single V groove when welding heavy sections and when welding in deep grooves. The double V groove joint requires approximately one-half the amount of filler metal used to produce the single V groove joint for the same plate thickness. In general, butt joints prepared from both sides permit easier welding, produce less distortion, and insure better weld metal qualities in heavy sections than joints prepared from one side only.
6-12. CORNER JOINT
a. The common corner joints are classified as flush or closed, half open, and full open.
b. This type of joint is used to join two members located at approximately right angles to each other in the form of an L. The fillet weld corner joint (view A, fig. 6-19) is used in the construction of boxes, box frames, tanks, and similar fabrications.
c. The closed corner joint (view B, fig. 6-19) is used on light sheet metal, usually 20 gage or less, and on lighter sheets when high strength is not required at the joint. In making the joint by oxyacetylene welding, the overlapping edge is melted down, and little or no filler metal is added. In arc welding, only a very light bead is required to make the joint. When the closed joint is used for heavy sections, the lapped plate is V beveled or U grooved to permit penetration to root of the joint.
d. Half open comer joints are suitable for material 12 gage and heavier. This joint is used when welding can only be performed on one side and when loads will not be severe.
e. The open corner joint (view C, fig. 6-19) is used on heavier sheets and plates. The two edges are melted down and filler metal is added to fill up the corner. This type of joint is the strongest of the corner joints.
f. Corner joints on heavy plates are welded from both sides as shown in view D, figure 6-19. The joint is first welded from the outside, then reinforced from the back side with a seal bead.
6-13. EDGE JOINT
This type of joint is used to join two or more parallel or nearly parallel members. It is not very strong and is used to join edges of sheet metal, reinforcing plates in flanges of I beams, edges of angles, mufflers, tanks for liquids, housing, etc. Two parallel plates are joined together as shown in view A, figure 6-20. On heavy plates, sufficient filler metal is added to fuse or melt each plate edge completely and to reinforce the joint.
b. Light sheets are welded as shown in view B, figure 6-20. No preparation is necessary other than to clean the edges and tack weld them in position. The edges are fused together so no filler metal is required. The heavy plate joint as shown in view C, figure 6-20, requires that the edges be beveled in order to secure good penetration and fusion of the side walls. Filler metal is used in this joint.
6-14. LAP JOINT
This type of joint is used to join two overlapping members. A single lap joint where welding must be done from one side is shown in view A, figure 6-21. The double lap joint is welded on both sides and develops the full strength of the welded members (view B, fig. 6-21). An offset lap joint (view C, fig. 6-21) is used where two overlapping plates must be joined and welded in the same plane. This type of joint is stronger than the single lap type, but is more difficult to prepare.
6-15. TEE JOINT
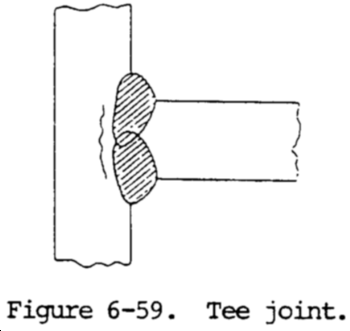
a. Tee joints are used to weld two plates or section with surfaces located approximately 90 degrees to each others at the joint, but the surface of one plate or section is not in the same plane as the end of the other surface. A plain tee joint welded from both sides is shown in view B, figure 6-22. The included angle of bevel in the preparation of tee joints is approximately half that required for butt joints.
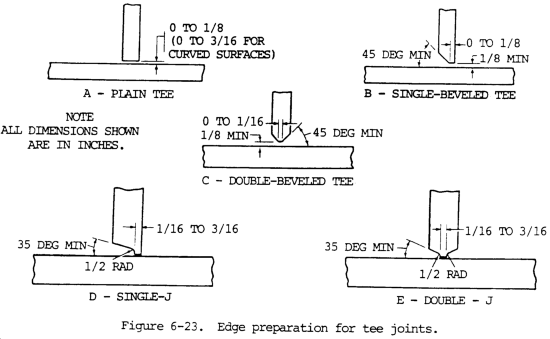
b. Other edge preparations used in tee joints are shown in figure 6-23. A plain tee joint, which requires no preparation other than cleaning the end of the vertical plate and the surface of the horizontal plate, is shown in view A, figure 6-23. The single beveled joint (view B, fig. 6-23) is used on heavy plates that can be welded from both sides. The double beveled joint (view C, fig. 6-23) is used heavy plates that can be welded from both sides. The single J joint (view D, fig. 6-23) used for welding plates 1 in. thick or heavier where welding is done from one side. The double J joint (view E, fig. 6-23) is used for welding very heavy plates form both sides.
c. Care must be taken to insure penetration into the root of the weld. This penetration is promoted by root openings between the ends of the vertical members and the horizontal surfaces.
6-16. TYPES OF WELDS
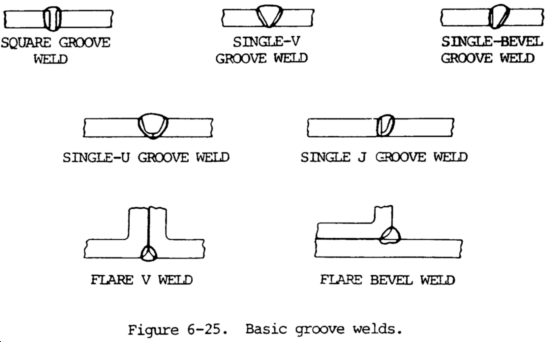
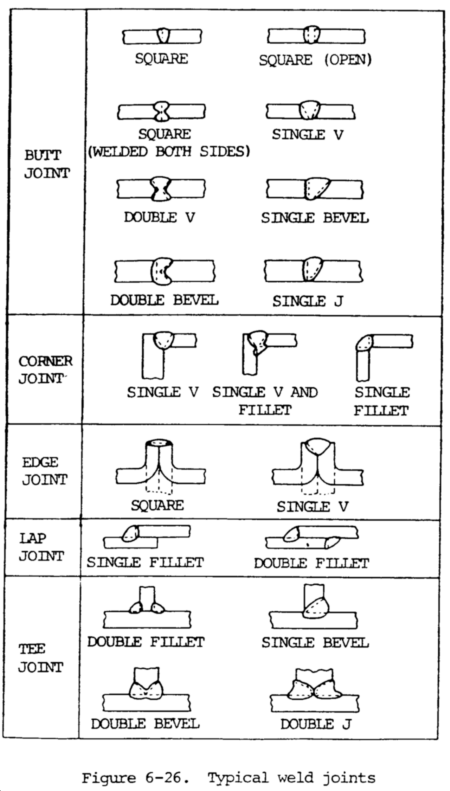
a. General. It is important to distinguish between the joint and the weld. Each must be described to completely describe the weld joint. There are many different types of welds, which are best described by their shape when shown in cross section. The most popular weld is the fillet weld, named after its cross-sectional shape. Fillet welds are shown by figure 6-24. The second most popular is the groove weld. There are seven basic types of groove welds, which are shown in figure 6-25. Other types of welds include flange welds, plug welds, slot welds, seam welds, surfacing welds, and backing welds. Joints are combined with welds to make weld joints. Examples are shown in figure 6-26. The type of weld used will determine the manner in which the seam, joint, or surface is prepared.
b. Groove Weld. These are beads deposited in a groove between two members to be joined. See figure 6-27 for the standard types of groove welds.
c. Surfacing weld (fig. 6-28). These are welds composed of one or more strings or weave beads deposited on an unbroken surface to obtain desired properties or dimensions. This type of weld is used to build up surfaces or replace metal on worn surfaces. It is also used with square butt joints.
d. Plug Weld (fig. 6-28). Plug welds are circular welds made through one member of a lap or tee joint joining that member to the other. The weld may or may not be made through a hole in the first member; if a hole is used, the walls may or may not be parallel and the hole may be partially or completely filled with weld metal. Such welds are often used in place of rivets.
NOTE
A fillet welded hole or a spot weld does not conform to this definition.
e. Slot Weld (fig. 6-28). This is a weld made in an elongated hole in one member of a lap or tee joint joining that member to the surface of the other member that is exposed through the hole. This hole may be open at one end and may be partially or completely filled with weld metal.
NOTE
A fillet welded slot does not conform to this definition.
f. Fillet Weld (top, fig. 6-28). This is a weld of approximately triangular cross section joining two surfaces at approximately right angles to each other, as in a lap or tee joint.
g. Flash Weld (fig. 6-29). A weld made by flash welding (para 6-5 d).
h. Seam Weld (fig. 6-29). A weld made by arc seam or resistance seam welding (para 6-5 b). Where the welding process is not specified, this term infers resistance seam welding.
i. Spot Weld (fig. 6-29). A weld made by arc spot or resistance spot welding (para 6-5 a). Where the welding process is not specified, this term infers a resistance spot weld.
j. Upset Weld (fig. 6-29). A weld made by upset welding (para 6-5 e).
Section IV. WELDING POSITIONS
6-17. GENERAL
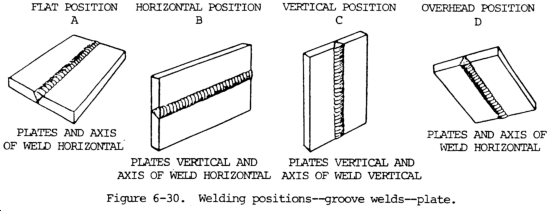
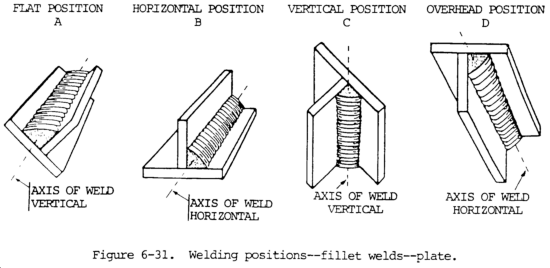
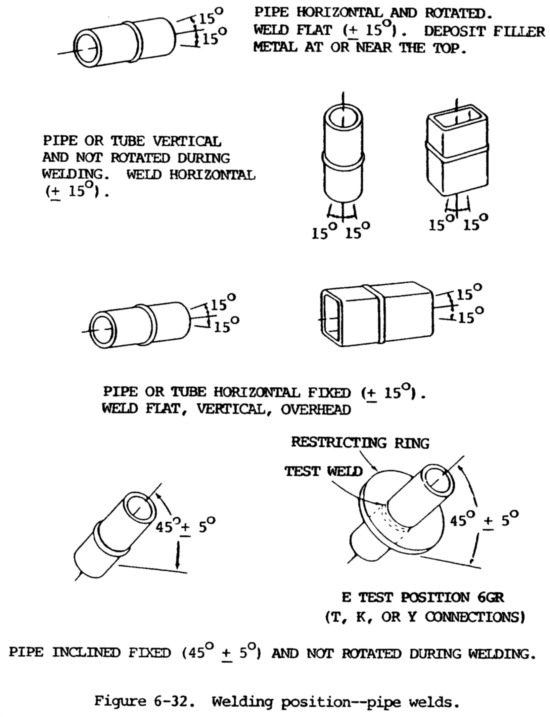
Welding is often done on structures in the position in which they are found. Techniques have been developed to allow welding in any position. Some welding processes have all-position capabilities, while others may be used in only one or two positions. All welding can be classified according to the position of the workpiece or the position of the welded joint on the plates or sections being welded. There are four basic welding positions, which are illustrated in figures 6-30 and 6-31. Pipe welding positions are shown in figure 6-32. Fillet, groove, and surface welds may be made in all of the following positions.
6-18. FLAT POSITION WELDING
In this position, the welding is performed from the upper side of the joint, and the face of the weld is approximately horizontal. Flat welding is the preferred term; however, the same position is sometimes called downhand. (See view A, figure 6-30 and view A, figure 6-31 for examples of flat position welding for fillet and groove welds).
6-19. HORIZONTAL POSITION WELDING
NOTE
The axis of a weld is a line through the length of the weld, perpendicular to the cross section at its center of gravity.
a. Fillet Weld. In this position, welding is performed on the upper side of an approximately horizontal surface and against an approximately vertical surface. View B, figure 6-31, illustrates a horizontal fillet weld.
b. Groove Weld. In this position, the axis of the weld lies in an approximately horizontal plane and the face of the weld lies in an approximately vertical plane. View B, figure 6-30, illustrates a horizontal groove weld.
c. Horizontal Fixed Weld. In this pipe welding position, the axis of the pipe is approximately horizontal, and the pipe is not rotated during welding. Pipe welding positions are shown in figure 6-32.
d. Horizontal Rolled Weld. In this pipe welding position, welding is performed in the flat position by rotating the pipe. Pipe welding positions are shown in figure 6-32.
6-20. VERTICAL POSITION WELDING
a. In this position, the axis of the weld is approximately vertical. Vertical welding positions are shown in view C, figures 6-30 and 6-31.
b. In vertical position pipe welding, the axis of the pipe is vertical, and the welding is performed in the horizontal position. The pipe may or may not be rotated. Pipe welding positions are figure shown in figure 6-32.
6-21. OVERHEAD POSITION WELDING
In this welding position, the welding is performed from the underside of a joint. Overhead position welds are illustrated in view D, figures 6-30 and 6-31.
6-22. POSITIONS FOR PIPE WELDING
Pipe welds are made under many different requirements and in different welding situations. The welding position is dictated by the job. In general, the position is fixed, but in sane cases can be rolled for flat-position work. Positions and procedures for welding pipe are outlined below.
a. Horizontal pipe rolled Weld
(1) Align the joint and tack weld or hold in position with steel bridge clamps with the pipe mounted on suitable rollers (fig. 6-33). Start welding at point C, figure 6-33, progressing upward to point B. When point B is reached, rotate the pipe clockwise until the stopping point of the weld is at point C and again weld upward to point B. When the pipe is being rotated, the torch should be held between points B and C and the pipe rotated past it.
(2) The position of the torch at point A (fig. 6-33) is similar to that for a vertical weld. As point B is approached, the weld assumes a nearly flat position and the angles of application of the torch and rod are altered slightly to compensate for this change.
(3) The weld should be stopped just before the root of the starting point so that a small opening remains. The starting point is then reheated, so that the area surrounding the junction point is at a uniform temperature. This will insure a complete fusion of the advancing weld with the starting point.
(4) If the side wall of the pipe is more than 1/4 in. (0.64 cm) in thickness, a multipass weld should be made.
b. Horizontal Pipe Fixed Position Weld.
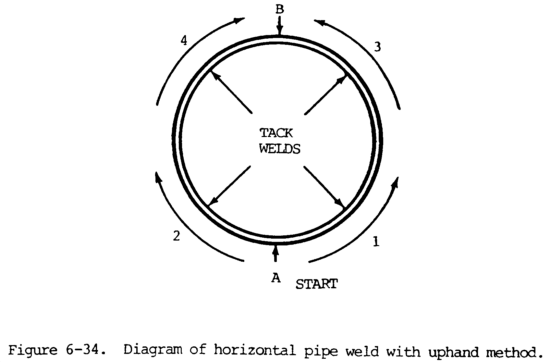
(1) After tack welding, the pipe is set up so that the tack welds are oriented approximately as shown in figure 6-34. After welding has been started, the pipe must not be moved in any direction.
(2) When welding in the horizontal fixed position, the pipe is welded in four steps as described below.
Step 1
. Starting at the bottom or 6 o'clock position, weld upward to the 3 o�clock position.Step 2. Starting back at the bottom, weld upward to the 9 o'clock position.
Step 3. Starting back at the 3 o�clock position, weld to the top.
Step 4. Starting back at the 9 o�clock position, weld upward to the top overlapping the bead.
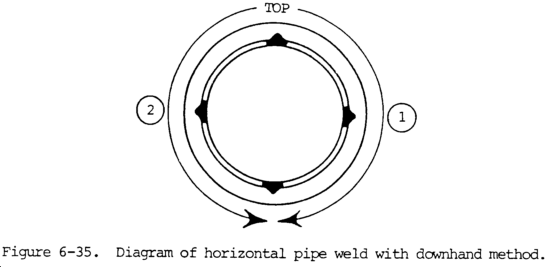
(3) When welding downward, the weld is made in two stages. Start at the top (fig. 6-35) and work down one side (1, fig. 6-35) to the bottom, then return to the top and work down the other side (2, fig. 6-35) to join with the previous weld at the bottom. The welding downward method is particularly effective with arc welding, since the higher temperature of the electric arc makes possible the use of greater welding speeds. With arc welding, the speed is approximately three times that of the upward welding method.
(4) Welding by the backhand method is used for joints in low carbon or low alloy steel piping that can be rolled or are in horizontal position. One pass is used for wall thicknesses not exceeding 3/8 in. (0.95 cm), two passes for wall thicknesses 3/8 to 5/8 in. (0.95 to 1.59 cm), three passes for wall thicknesses 5/8 to 7/8 in. (1.59 to 2.22 cm), and four passes for wall thicknesses 7/8 to 1-1/8 in. (2.22 to 2.87 cm).
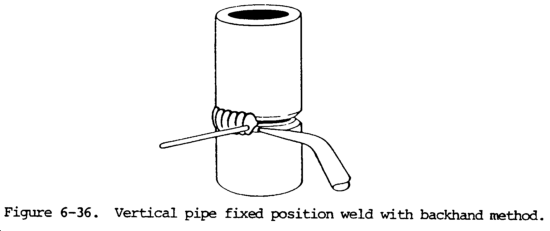
c. Vertical Pipe Fixed Position Weld. Pipe in this position, wherein the joint is horizontal, is most frequently welded by the backhand method (fig. 6-36). The weld is started at the tack and carried continuously around the pipe.
d. Multipass Arc Welding.
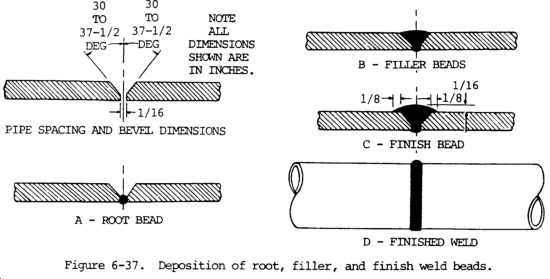
(1) Root beads. If a lineup clamp is used, the root bead (view A, fig. 6-37) is started at the bottom of the groove while the clamp is in position. When no backing ring is used, care should be taken to build up a slight bead on the inside of the pipe. If a backing ring is used, the root bead should be carefully fused to it. As much root bead as the bars of the lineup clamp will permit should be applied before the clamp is removed. Complete the bead after the clamp is removed.
(2) Filler beads. Care should be taken that the filler beads (view B, fig. 6-37) are fused into the root bead, in order to remove any undercut causal by the deposition of the root bead. One or more filler beads around the pipe usually will be required.
(3) Finish beads. The finish beads (view C, fig. 6-37) are applied over the filler beads to complete the joint. Usually, this is a weave bead about 5/8 in. (1.59 cm) wide and approximately 1/16 in. (0.16 cm) above the outside surface of the pipe when complete. The finished weld is shown in view D, figure 6-37.
e. Aluminum pipe welding. For aluminum pipe, special joint details have been developed and are normally associated with combination-type procedures. A backing ring is not used in most cases. The rectangular backing ring is rarely used when fluids are transmitted through the piping system. It may be used for structural applications in which pipe and tubular members are used to transmit loads rather than materials.
6-23. FOREHAND WELDING
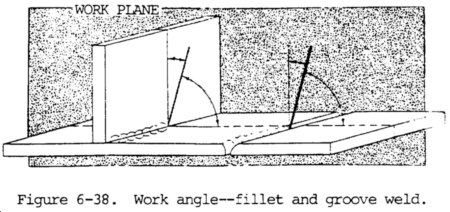
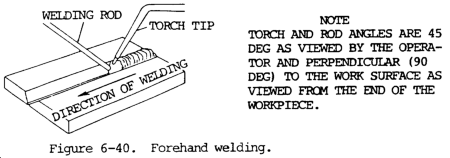
a. Work angle is the angle that the electrode, or centerline of the welding gun, makes with the referenced plane or surface of the base metal in a plane perpendicular to the axis of a weld. Figure 6-38 shows the work angle for a fillet weld and a groove weld. For pipe welding, the work angle is the angle that the electrode, or centerline of the welding gun, makes with the referenced plane or surface of the pipe in a plane extending from the center of the pipe through the puddle. Travel angle is the angle that the electrode, or centerline of the welding gun, makes with a reference line perpendicular to the axis of the weld in the plane of the weld axis. Figure 6-39 illustrates the travel angle for fillet and groove welds. For pipe welding, the travel angle is the angle that the electrode, or centerline of the welding gun, makes with a reference line extending from the center of the pipe through the arc in the plane of the weld axis. The travel angle is further described as a drag angle or a push angle. Figure 6�39 shows both drag angles and push angles. The push angle, which points forward in the direction of travel, is also known as forehand welding.
b. In forehand welding, the welding rod precedes the torch. The torch is held at an approximately 30 degree angle from vertical, in the direction of welding as shown in figure 6-40. The flame is pointed in the direction of welding and directed between the rod and the molten puddle. This position permits uniform preheating of the plate edges immediately ahead of the molten puddle. By moving the torch and the rod in opposite semicircular paths, the heat can be carefully balanced to melt the end of the rod and the side walls of the plate into a uniformly distributed molten puddle. The rod is dipped into the leading edge of the puddle so that enough filler metal is melted to produce an even weld joint. The heat reflected backwards from the rod keeps the metal molten. The metal is distributed evenly to both edges being welded by the motion of the tip and rod.
c. This method is satisfactory for welding sheets and light plates in all positions. Some difficulties are encountered in welding heavier plates for the reasons given below:
(1) In forehand welding, the edges of the plate must be beveled to provide a wide V with a 90 degree included angle. This edge preparation is necessary to insure satisfactory melting of the plate edges, good penetration, and fusion of the weld metal to the base metal.
(2) Because of this wide V, a relatively large molten puddle is required. It is difficult to obtain a good joint when the puddle is too large.
6-24. BACKHAND WELDING
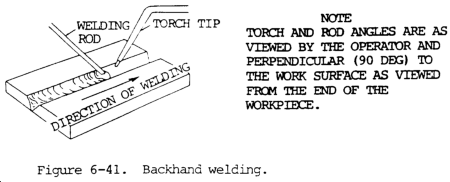
a. Backhand welding, also known as drag angle, is illustrated in figure 6-41. The drag angle points backward from the direction of travel.
b. In this method, the torch precedes the welding rod, as shown in figure 6-41. The torch is held at an angle approximately 30 degrees from the vertical, away from the direction of welding, with the flame directed at the molten puddle. The welding rod is between the flame and the molten puddle. This position requires less transverse motion than is used in forehand welding.
c. Backhand welding is used principally for welding heavy sections because it permits the use of narrower V's at the joint. A 60 degree included angle of bevel is sufficient for a good weld. In general, there is less puddling, and less welding rod is used with this method than with the forehand method.
Section V. EXPANSION AND CONTRACTION IN WELDING OPERATIONS
6-25. GENERAL
a. Most of the welding processes involve heat. High-temperature heat is responsible for much of the welding warpages and stresses that occur. When metal is heated, it expands in all direction. When metal cools, it contracts in all directions. Some distortions caused by weld shrinkage are shown in figure 6-42.
b. There is a direct relationship between the amount of temperature change and change in dimension. This is based on the coefficient of thermal expansion. Thermal expansion is a measure of the linear increase in unit length based on the change in temperature of the material. The coefficient of expansion for the various metals. Aluminum has one of the highest coefficient of expansion ratios, and changes in dimension almost twice as much as steel for the same temperature change.
c. A metal expands or contracts by the same amount when heated or cooled the same temperature if it is not restrained. If the expansion of the part being welded is restrained, buckling or warping may occur. If contraction is restrained, the parts may be cracked or distorted because of the shrinkage stresses.
d. When welding, the metals that are heated and cooled are not unrestrained since they are a part of a larger piece of metal which is not heated to the same temperature. Parts not heated or not heated as much tend to restrain that portion of the same piece of metal that is heated to a higher temperature. This non-uniform heating always occurs in welding. The restraint caused by the part being non-uniformly heated is the principal cause for the thermal distortion and warpages that occur in welding.
e. Residual stresses that occur when metal is subjected to non-uniform temperature change are called thermal stresses. These stresses in weldments have two major effects: they produce distortion, and may cause premature failure in weldments.
6-26. CONTROLLING CONTRACTION IN SHEET METAL
a. The welding procedure should be devised so that contraction stresses will be held to a minimum order to keep the desired shape and strength of the welded part. Some of the methods used for controlling contraction are described below.
b. The backstep method as shown in view A, figure 6-43, may be used. With the backstep method, each small weld increment has its own shrinkage pattern, which then becomes insignificant to the total pattern of the entire weldment.
c. In welding long seams, the contraction of the metal deposited at the joint will cause the edges being welded to draw together and possibly overlap. This action should be offset by wedging the edges apart as shown in view B, figure 6-43. The wedge should be moved forward as the weld progresses. The spacing of the wedge depends on the type of metal and its thickness. Spacing for metals more than 1/8 in. (3.2 mm) thick is approximately as follows:
|
Metal |
In. per ft |
|
Steel |
1/4 to 3/8 |
|
Brass and Bronze |
3/16 |
|
Aluminum |
1/4 |
|
Copper |
3/16 |
|
Lead |
5/16 |
d. Sheet metal under 1/16 in. (0.16 cm) thick may be welded by flanging the edges as shown in figure 6-20, and tacking at intervals along the seam before welding. A weld can be produced in this manner without the addition of filler metal.
e. Buckling and warping can be prevented by the use of quench plates as shown in figure 6-44. The quench plates are heavy pieces of metal clamped parallel to the seam being welded with sufficient space between to permit the welding operation. These quench plates absorb the heat of welding, thereby decreasing the stresses due to expansion and contraction.
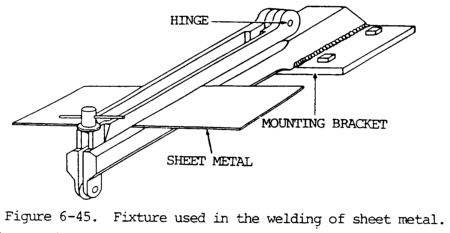
f. Jigs and fixtures may be used to hold members in place for welding. These are usually heavy sections in the vicinity of the seam (fig. 6-45). The heavy sections cool the plate beyond the area of the weld.
g. In pipe welding, spacing as illustrated in figure 6-43, is not practical. Proper alignment of pipe can be best obtained by tack welding to hold the pieces in place. The pipes should be separated by a gap of 1/8 to 1/4 in. (0.32 to 0.64 cm), depending on the size of the pipe being welded.
6-27. CONTROLLING CONTRACTION AND EXPANSION IN CASTINGS
a. Prior to welding gray iron castings, expansion and contraction are provided for by preheating. Before welding, small castings can be preheated by means of a torch to a very dull red heat, visible in a darkened room. After welding, a reheating and controlled slow cooling or annealing will relieve internal stresses and assure a proper gray iron structure.
b. For larger castings, temporary charcoal-fired furnaces built of fire brick and covered with fire resistant material are often used. Only local preheating of parts adjacent to the weld is usually necessary (fig. 6-46). Such local preheating can be done with a gasoline, kerosene, or welding torch.
c. Before welding a crack that extends from the edge of a casting, it is advisable to drill a small hole 1/2 to 1 in. (1.27 to 2.54 cm) beyond the visible the crack. If the applied heat causes the crack to run, it will only extend drill hole.
d. If a crack does not extend to the end of a casting, it is advisable to drill a small hole 1/2 to 1 in. (1.27 to 2.54 cm) beyond each end of the visible crack.
e. The above procedures apply to gray iron castings, as well as bronze welded castings, except that less preheat is required for bronze welded castings.
6-28. WELDING DISTORTION AND WARPAGE
a. General. The high temperature heat involved in most welding processes is largely responsible for the distortion, warpage, and stresses that occur. When heated, metal expands in all directions and when it cools, it contracts in all directions. As described in paragraph 6-25, there is a direct relationship between the amount of temperature change and the change in dimension of the metal. A metal expands or contracts by the same amount when heated or cooled the same temperature, if it is not restrained. However, in welding, the metals that are heated and cooled are not unrestrained, because they are a part of a larger piece of metal which is not heated to the same temperature. This non-uniform heating and partial restraint is the main cause of thermal distortion and warpage that occur in welding. Figure 6-47 shows the effects of expansion on a cube of metal. When the cube of metal is exposed to a temperature increase, it will expand in the x, y, and z directions. When it cools, if unrestricted, it will contract by the same amount as it expanded.
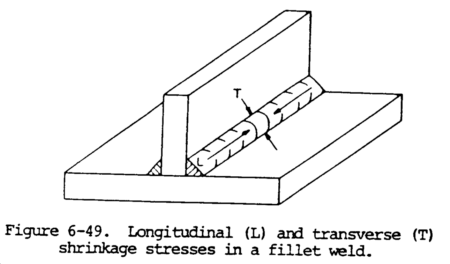
b. A weld is usually made progressively, which causes the solidified portions of the weld to resist the shrinkage of later portions of the weld bead. The portions welded first are forced in tension down the length of the weld bead (longitudinal to the weld) as shown in figure 6-48. In the case of a butt weld, little motion of the weld is permitted in the direction across the material face (transverse direction) because of the weld joint preparation or stiffening effect of underlying passes. In these welds, as shown in figure 6-48, there will also be transverse residual stresses. For fillet welds, as shown in figure 6-49, the shrinkage stresses are rigid down the length of the weld and across its face.
c. At the point of solidification, the molten metal has little or no strength. As it cools, it acquires strength. It is also in its expanded form because of its high temperature. The weld metal is now fused to the base metal, and they work together. As the metal continues to cool, it acquires higher strength and is now contracting in three directions. The arc depositing molten metal is a moving source of heat and the cooling differential is also a moving factor, but tends to follow the travel of the arc. With the temperature still declining and each small increment of heated metal tending to contract, contracting stresses will occur, and there will be movement in the metal adjacent to the weld. The unheated metal tends to resist the cooling dimension changes of the previously molten metal. Temperature differential has an effect on this.
d. The temperate differential is determined by thermal conductivity. The higher the thermal conductivity of the metal, the less effect differential heating will have. For example, the thermal conductivity of copper is the highest, aluminum is half that amount, and steel about one-fifth that of copper. Heat would move more quickly through a copper bar than through a steel bar, and the temperature differential would not be so great. This physical property must be considered when welding, along with the fact that arc temperatures are very similar but the metal melting points are somewhat different.
e. Another factor is the travel speed of the heat source or arc. If the travel speed is relatively fast, the effect of the heat of the arc will cause expansion of the edges of the plates, and they will bow outward and open up the joint. This is the same as running a bead on the edge of the plate. In either case, it is a momentary situation which continues to change as the weld progresses. By adjusting the current and travel speed, the exact speed can be determined for a specific joint design so that the root will neither open up nor close together.
f. Residual stresses in weldments produce distortion and may be the cause of premature failure in weldments. Distortion is caused when the heated weld region contracts non-uniformly, causing shrinkage in one part of the weld to exert eccentric forces on the weld cross section. The weldment strains elastically in response to these stresses, and this non-uniform strain is seen in macroscopic distortion. The distortion may appear in butt joints as both longitudinal and transverse shrinkage or shrinks more plates along contraction and as angular change (rotation) when the face of the weld than the root. The angular change produces transverse bending in the the weld length. These effects are shown in figure 6-50.
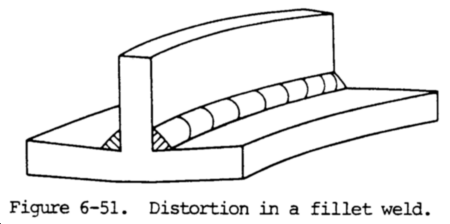
g. Distortion in fillet welds is similar to that in butt welds. Transverse and longitudinal shrinkage as well as angular distortion result from the unbalanced nature of the stresses in these welds (fig. 6-51). Since fillet welds are often used in combination with other welds in a weldment, the distortion may be complex.
h. Residual stresses and distortion affect materials by contributing to buckling, curling, and fracturing at low applied stress levels. When residual stresses and their accompanying distortion are present, buckling may occur at liner compressive loads than would be predicted otherwise. In tension, residual stresses may lead to high local stresses in weld regions of low toughness and may result in running brittle cracks which can spread to low overall stress areas. Residual stresses may also contribute to fatigue or corrosion failures.
i. Control of distortion can be achieved by several methods. Commonly used methods include those which control the geometry of the weld joint, either before or during welding. These methods include prepositioning the workplaces before welding so that weld distortion leaves them in the desired final geometry, or restraining the workplaces so they cannot move and distort during welding. Designing the joint so that weld deposits are balanced on each side of the center line is another useful technique. Welding process selection and weld sequence also influence distortion and residual stress. Some distorted weldments can be straightened mechanically after welding, and thermal or flame straightening can also be applied.
j. Residual stresses may be eliminated by both thermal and mechanical means. During thermal stress relief, the weldment is heated to a temperature at which the yield point of the metal is low enough for plastic flow to occur and allow relaxation of stress. The mechanical properties of the weldment may also change, but not always toward a more uniform distribution across the joint. For example, the brittle fracture resistance of many steel weldments is improved by thermal stress relief not only because the residual stresses in the weld are reduced, but also because hard weld heat-affected zones are tempered and made tougher by this procedure. Mechanical stress relief treatments will also reduce residual stresses, but will not change the microstructure or hardness of the weld or heat-affected zone. Peening, proofstressing, and other techniques are applied to weldments to accomplish these ends.
k. The welder must consider not only reducing the effects of residual stresses and distortion, but also the reduction of cracks, porosity, and other discontinuities; material degradation due to thermal effects during welding; the extent of nondestructive testing; and fabrication cost. A process or procedure which produces less distortion may also produce more porosity and cracking in the weld zone. Warping and distortion can be minimized by several methods. General methods include:
(1) Reducing residual stresses and distortion prior to welding by selecting proper processes and procedures.
(2) Developing better means for stress relieving and removing distortion.
(3) Changing the structural design and the material so that the effects of residual stresses and distortion can be minimized.
The following factors should be taken into consideration when welding in order to reduce welding warpage:
(1) The location of the neutral axis and its relationship in both directions.
(2) The location of welds, size of welds, and distance from the neutral axis in both directions.
(3) The time factor for welding and cooling rates when making the various welds.
(4) The opportunity for balancing welding around the neutral axis.
(5) Repetitive identical structure and varying the welding techniques based on measurable warpage.
(6) The use or procedures and sequences to minimize weldment distortion.
When welding large structures and weldments, it is important to establish a procedure to minimize warpage. The order of joining plates in a deck or on a tank will affect stresses and distortion. As a general rule, transverse welds should be made before longitudinal welds. Figure 6-52 shows the order in which the joints should be welded.
Warpage can be minimized in smaller structures by different techniques, which include the following:
(1) The use of restraining fixtures, strong backs, or many tack welds.
(2) The use of heat sinks or the fast cooling of welds.
(3) The predistortion or prebending of parts prior to welding.
(4) Balancing welds about the weldment neutral axis or using wandering sequences or backstep welding.
(5) The use of intermittent welding to reduce the volume of weld metal.
(6) The use of proper joint design selection and minimum size.
(7) As a last resort, use preheat or peening.
Section VI. WELDING PROBLEMS AND SOLUTIONS
6-29. STRESSES AND CRACKING
a. In this section, welding stresses and their effect on weld cracking is explained. Factors related to weldment failure include weld stresses, cracking, weld distortion, lamellar tearing, brittle fracture, fatigue cracking, weld design, and weld defects.
b. When weld metal is added to the metal being welded, it is essentially cast metal. Upon cooling, the weld metal shrinks to a greater extent than the base metal in contact with the weld, and because it is firmly fused, exerts a drawing action. This drawing action produces stresses in and about the weld which may cause warping, buckling, residual stresses, or other defects.
c. Stress relieving is a process for lowering residual stresses or decreasing their intensity. Where parts being welded are fixed too firmly to permit movement, or are not heated uniformly during the welding operation, stresses develop by the shrinking of the weld metal at the joint. Parts that cannot move to allow expansion and contraction must be heated uniformly during the welding operation. Stress must be relieved after the weld is completed. These precautions are important in welding aluminum, cast iron, high carbon steel, and other brittle metals, or metals with low strength at temperatures immediately below the melting point. Ductile materials such as bronze, brass, copper, and mild steel yield or stretch while in the plastic or soft conditions, and are less liable to crack. However, they may have undesirable stresses which tend to weaken the finished weld.
d. When stresses applied to a joint exceed the yield strength, the joint will yield in a plastic fashion so that stresses will be reduced to the yield point. This is normal in simple structures with stresses occurring in one direction on parts made of ductile materials. Shrinkage stresses due to normal heating and cooling do occur in all three dimensions. In a thin, flat plate, there will be tension stresses at right angles. As the plate becomes thicker, or in extremely thick materials, the stresses occur in three directions.
e. When simple stresses are imposed on thin, brittle materials, the material will fail in tension in a brittle manner and the fracture will exhibit little or no pliability. In such cases, there is no yield point for the material, since the yield strength and the ultimate strength are nearly the same. The failures that occur without plastic deformation are known as brittle failures. When two or more stresses occur in a ductile material, and particularly when stresses occur in three directions in a thick material, brittle fracture may occur.
f. Residual stresses also occur in castings, forgings, and hot rolled shapes. In forgings and castings, residual stresses occur as a result of the differential cooling that occurs. The outer portion of the part cools first, and the thicker and inner portion cools considerably faster. As the parts cool, they contract and pick up strength so that the portions that cool earlier go into a compressive load, and the portions that cool later go into a tensile stress mode. In complicated parts, the stresses may cause warpage.
g. Residual stresses are not always detrimental. They may have no effect or may have a beneficial effect on the service life of parts. Normally, the outer fibers of a part are subject to tensile loading and thus, with residual compression loading, there is a tendency to neutralize stress in the outer fibers of the part. An example of the use of residual stress is in the shrink fit of parts. A typical example is the cooling of sleeve bearings to insert them into machined holes, and allow them to expand to their normal dimension to retain then in the proper location. Sleeve bearings are used for heavy, Slow machinery, and are subject to compressive residual loading, keeping them within the hole. Large roller bearings are usually assembled to shafts by heating to expand them slightly so they will fit on the shaft, then allowing them to cool, to produce a tight assembly.
h. Residual stresses occur in all arc welds. The most common method of measuring stress is to produce weld specimens and then machine away specific amounts of metal, which are resisting the tensile stress in and adjacent to the weld. The movement that occurs is then measured. Another method is the use of grid marks or data points on the surface of weldments that can be measured in multiple directions. Cuts are made to reduce or release residual stresses from certain parts of the weld joint, and the measurements are taken again. The amount of the movement relates to the magnitude of the stresses. A third method utilizes extremely small strain gauges. The weldment is gradually and mechanically cut from adjoining portions to determine the change in internal stresses. With these methods, it is possible to establish patterns and actually determine amounts of stress within parts that were caused by the thermal effects of welds.
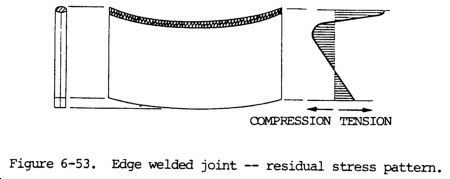
i. Figure 6-53 shows residual stresses in an edge weld. The metal close to the weld tends to expand in all directions when heated by the welding arc. This metal is restrained by adjacent cold metal and is slightly upset, or its thickness slightly increased, during this heating period. When the weld metal starts to cool, the upset area attempts to contract, but is again restrained by cooler metal. This results in the heated zone becoming stressed in tension. When the weld has cooled to room temperature, the weld metal and the adjacent base metal are under tensile stresses close to the yield strength. Therefore, there is a portion that is compressive, and beyond this, another tensile stress area. The two edges are in tensile residual stress with the center in compressive residual stress, as illustrated.
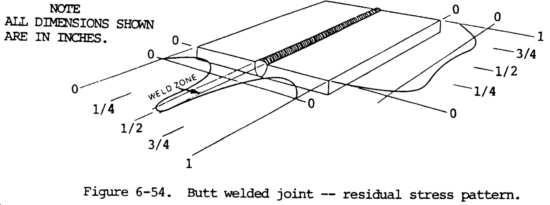
j. The residual stresses in a butt weld joint made of relatively thin plate are more difficult to analyze. This is because the stresses occur in the longitudinal direction of the weld and perpendicular to the axis of the weld. The residual stresses within the weld are tensile in the longitudinal direction of the weld and the magnitude is at the yield strength of the metal. The base metal adjacent to the weld is also at yield stress, parallel to the weld and along most of the length of the weld. When moving away from the weld into the base metal, the residual stresses quickly fall to zero, and in order to maintain balance, change to compression. This is shown in figure 6-54. The residual stresses in the weld at right angles to the axis of the weld are tensile at the center of the plate and compressive at the ends. For thicker materials when the welds are made with multipasses, the relationship is different because of the many passes of the heat source. Except for single-pass, simple joint designs, the compressive and tensile residual stresses can only be estimated.
k. As each weld is made, it will contract as it solidifies and gain strength as the metal cools. As it contracts, it tends to pull, and this creates tensile stresses at and adjacent to the weld. Further from the weld or bead, the metal must remain in equilibrium, and therefore compressive stresses occur. In heavier weldments when restraint is involved, movement is not possible, and residual stresses are of a higher magnitude. In a multipass single-groove weld, the first weld or root pass originally creates a tensile stress. The second, third, and fourth passes contract and cause a compressive load in the root pass. As passes are made until the weld is finished, the top passes will be in tensile load, the center of the plate in compression, and the root pass will have tensile residual stress.
l. Residual stresses can be decreased in several ways, as described below:
(1) If the weld is stressed by a load beyond its yield, strength plastic deformation will occur and the stresses will be more uniform, but are still located at the yield point of the metal. This will not eliminate residual stresses, but will create a more uniform stress pattern. Another way to reduce high or peak residual stresses is by means of loading or stretching the weld by heating adjacent areas, causing them to expand. The heat reduces the yield strength of the weld metal and the expansion will tend to reduce peak residual stresses within the weld. This method also makes the stress pattern at the weld area more uniform.
(2) High residual stresses can be reduced by stress relief heat treatment. With heat treatment, the weldment is uniformly heated to an elevated temperature, at which the yield strength of the metal is greatly reduced. The weldment is then allowed to cool slowly and uniformly so that the temperature differential between parts is minor. The cooling will be uniform and a uniform low stress pattern will develop within the weldment.
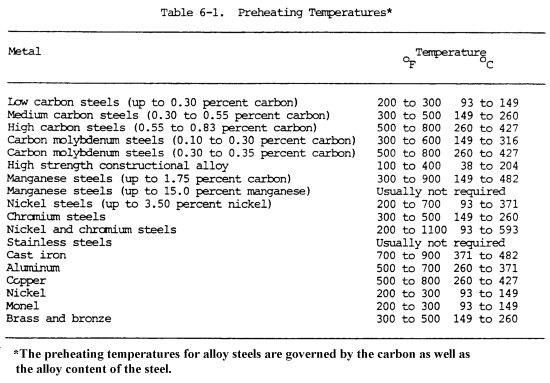
(3) High-temperature preheating can also reduce residual stress, since the entire weldment is at a relatively high temperature, and will cool more or less uniformly from that temperature and so reduce peak residual stresses.
m. Residual stresses also contribute to weld cracking. Weld cracking sometimes occurs during the manufacture of the weldment or shortly after the weldment is completed. Cracking occurs due to many reasons and may occur years after the weldment is completed. Cracks are the most serious defects that occur in welds or weld joints in weldments. Cracks are not permitted in most weldments, particularly those subject to low-temperature when the failure of the weldment will endanger life.
n. Weld cracking that occurs during or shortly after the fabrication of the weldment can be classified as hot cracking or cold cracking. In addition, weld may crack in the weld metal or in the base metal adjacent to welds metal, usually in the heat-affected zone. Welds crack for many reasons, including the following:
(1) Insufficient weld metal cross section to sustain the loads involved.
(2) Insufficient ductility of weld metal to yield under stresses involved.
(3) Under-bead cracking due to hydrogen pickup in a hardenable type of base material.
o. Restraint and residual stresses are the main causes of weld cracking during the fabrication of a weldment. Weld restraint can come from several factors, including the stiffness or rigidity of the weldment itself. Weld metal shrinks as it cools, and if the parts being welded cannot move with respect to one another and the weld metal has insufficient ductility, a crack will result. Movement of welds may impose high loads on other welds and cause them to crack during fabrication. A more ductile filler material should be used, or the weld should be made with sufficient cross-sectional area so that as it cools, it will have enough strength to withstand cracking tendencies. Typical weld cracks occur in the root pass when the parts are unable to move.
p. Rapid cooling of the weld deposit is also responsible for weld cracking. If the base metal being joined is cold and the weld is small, it will cool quickly. Shrinkage will also occur quickly, and cracking can occur. If the parts being joined are preheated even slightly, the cooling rate will be lower and cracking can be eliminated.
q. Alloy or carbon content of base material can also affect cracking. When a weld is made with higher-carbon or higher-alloy base material, a certain amount of the base material is melted and mixed with the electrode to produce the weld metal. The resulting weld metal has higher carbon and alloy content. It may have higher strength, but it has less ductility. As it shrinks, it may not have enough ductility to cause plastic deformation, and cracking may occur.
r. Hydrogen pickup in the weld metal and in the heat-affected zone can also cause cracking. When using cellulose-covered electrodes or when hydrogen is present because of damp gas, damp flux, or hydrocarbon surface materials, the hydrogen in the arc atmosphere will be absorbed in the molten weld metal and in adjoining high-temperature base metal. As the metal cools, it will reject the hydrogen, and if there is enough restraint, cracking can occur. This type of cracking can be reduced by increasing preheat, reducing restraint, and eliminating hydrogen from the arc atmosphere.
s. When cracking is in the heat-affected zone or if cracking is delayed, the cause is usually hydrogen pickup in the weld metal and the heat-affected zone of the base metal. The presence of higher-carbon materials or high alloy in the base metal can also be a cause. When welding high-alloy or high-carbon steels, the buttering technique can be used to prevent cracking. This involves surf acing the weld face of the joint with a weld metal that is much lower in carbon or alloy content than the base metal. The weld is then made between the deposited surfacing material and avoids the carbon and alloy pickup in the weld metal, so a more ductile weld deposit is made. Total joint strength must still be great enough to meet design requirements. Underbead cracking can be reduced by the use of low-hydrogen processes and filler metals. The use of preheat reduces the rate of cooling, which tends to decrease the possibility of cracking.
t. Stress Relieving Methods.
(1) Stress relieving in steel welds may be accomplished by preheating between 800 and 1450°F (427 and 788°C), depending on the material, and then slowly cooling. Cooling under some conditions may take 10 to 12 hours. Small pieces, such as butt welded high speed tool tips, may be annealed by putting them in a box of fire resistant material and cooling for 24 hours. In stress relieving mild steel, heating the completed weld for 1 hour per 1.00 in. (2.54 cm) of thickness is common practice. On this basis, steel 1/4 in. (0.64 cm) thick should be preheated for 15 minutes at the stress relieving temperature.
(2) Peening is another method of relieving stress on a finished weld, usually with compressed air and a roughing or peening tool. However, excessive peening may cause brittleness or hardening of the finished weld and may actually cause cracking.
(3) Preheating facilitates welding in many cases. It prevents cracking in the heat affected zone, particularly on the first passes of the weld metal. If proper preheating times and temperatures are used, the cooling rate is slowed sufficiently to prevent the formation of hard martensite, which causes cracking. Table 6-1 lists preheating temperatures of specific metals.
(4) The need for preheating steels and other metals is increased under the following conditions:
(a) When the temperature of the part or surrounding atmosphere is at or below freezing.
(b) When the diameter of the welding rod is small in comparison to thickness of the metal being joined.
(c) When welding speed is high
(d) When the shape and design of the parts being welded are complicated.
(e) When there is a great difference in mass of the parts being welded.
(f) When welding steels with a high carbon, low manganese, or other alloy content.
(g) When steel being welded tends to harden when cooled in air from the welding temperature.
u. The following general procedures can be used to relieve stress and to reduce cracking:
(1) Use ductile weld metal.
(2) Avoid extremely high restraint or residual stresses.
(3) Revise welding procedures to reduce restraint.
(4) Utilize low-alloy and low-carbon materials.
(5) Reduce the cooling rate by use of preheat.
(6) Utilize low-hydrogen welding processes and filler metals.
(7) When welds are too small for the service intended, they will probably crack. The welder should ensure that the size of the welds are not smaller than the minimum weld size designated for different thicknesses of steel sections.
6-30. IN-SERVICE CRACKING
Weldments must be designed and built to perform adequately in service. The risk of failure of a weldment is relatively small, but failure can occur in structures such as bridges, pressure vessels, storage tanks, ships, and penstocks. Welding has sometimes been blamed for the failure of large engineering structures, but it should be noted that failures have occurred in riveted and bolted structures and in castings, forgings, hot rolled plate and shapes, as well as other types of construction. Failures of these types of structures occurred before welding was widely used and still occur in unwelded structures today. However, it is still important to make weldments and welded structures as safe against premature failure of any type as possible. There are four specific types of failures, including brittle fracture, fatigue fracture, lamellar tearing, and stress corrosion cracking.
a. Brittle Fracture. Fracture can be classified into two general categories, ductile and brittle.
(1) Ductile fracture occurs by deformation of the crystals and slip relative to each other. There is a definite stretching or yielding and a reduction of cross-sectional area at the fracture (fig. 6-55).
(2) Brittle fracture occurs by cleavage across individual crystals. The fracture exposes the granular structure, and there is little or no stretching or yielding. There is no reduction of area at the fracture (fig. 6-56).
(3) It is possible that a broken surface will display both ductile and brittle fracture over different areas of the surface. This means that the fracture which propagated across the section changed its mode of fracture.
(4) There are four factors that should be reviewed when analyzing a fractured surface. They are growth marking, fracture mode, fracture surface texture and appearance, and amount of yielding or plastic deformation at the fracture surface.
(5) Growth markings are one way to identify the type of failure. Fatigue failures are characterized by a fine texture surface with distinct markings produced by erratic growth of the crack as it progresses. The chevron or herringbone pattern occurs with brittle or impact failures. The apex of the chevron appearing on the fractured surface always points toward the origin of the fracture and is an indicator of the direction of crack propagation.
(6) Fracture mode is the second factor. Ductile fractures have a shear mode of crystalline failure. The surface texture is silky or fibrous in appearance. Ductile fractures often appear to have failed in shear as evidenced by all parts of the fracture surface assuming an angle of approximately 45 degrees with respect to the axis of the load stress.
(7) The third factor is fracture surface and texture. Brittle or cleavage fractures have either a granular or a crystalline appearance. Brittle fractures usually have a point of origin. The chevron pattern will help locate this point.
(8) An indication of the amount of plastic deformation is the necking down of the surface. There is little or no deformation for a brittle fracture, and usually a considerable necked down area in the case of a ductile fracture.
(9) One characteristic of brittle fracture is that the steel breaks quickly and without warning. The fractures increase at very high speeds, and the steels fracture at stresses below the normal yield strength for steel. Mild steels, which show a normal degree of ductility when tested in tension as a normal test bar, may fail in a brittle manner. In fact, mild steel may exhibit good toughness characteristics at roan temperature. Brittle fracture is therefore more similar to the fracture of glass than fracture of normal ductile materials. A combination of conditions must be present at the same time for brittle fracture to occur. Some of these factors can be eliminated and thus reduce the possibility of brittle fracture. The following conditions must be present for brittle fracture to occur: low temperature, a notch or defect, a relatively high rate of loading, and triaxial stresses normally due to thickness of residual stresses. The microstructure of the metal also has an effect.
(10) Temperature is an important factor which must be considered in conjunction with microstructure of the material and the presence of a notch. Impact testing of steels using a standard notched bar specimen at different temperatures shows a transition from a ductile type failure to a brittle type failure based on a lowered temperature, which is known as the transition temperature.
(11) The notch that can result from faulty workmanship or from improper design produces an extremely high stress concentration which prohibits yielding. A crack will not carry stress across it, and the load is transmitted to the end of the crack. It is concentrated at this point and little or no yielding will occur. Metal adjacent to the end of the crack which does not carry load will not undergo a reduction of area since it is not stressed. It is, in effect, a restraint which helps set up triaxial stresses at the base of the notch or the end of the crack. Stress levels much higher than normal occur at this point and contribute to starting the fracture.
(12) The rate of loading is the time versus strain rate. The high rate of strain, which is a result of impact or shock loading, does not allow sufficient time for the normal slip process to occur. The material under load behaves elastically, allowing a stress level beyond the normal yield point. When the rate of loading, from impact or shock stresses, occurs near a notch in heavy thick material, the material at the base of the notch is subjected very suddenly to very high stresses. The effect of this is often complete and rapid failure of a structure and is what makes brittle fracture so dangerous.
(13) Triaxial stresses are more likely to occur in thicker material than in thin material. The z direction acts as a restraint at the base of the notch, and for thicker material, the degree of restraint in the through direction is higher. This is why brittle fracture is more likely to occur in thick plates or complex sections than in thinner materials. Thicker plates also usually have less mechanical working in their manufacture than thinner plates and are more susceptible to lower ductility in the z axis. The microstructure and chemistry of the material in the center of thicker plates have poorer properties than the thinner material, which receives more mechanical working.
(14) The microstructure of the material is of major importance to the fracture behavior and transition temperature range. Microstructure of a steel depends on the chemical composition and production processes used in manufacturing it. A steel in the as-rolled condition will have a higher transition temperature or liner toughness than the same steel in a normalized condition. Normalizing, or heating to the proper temperature and cooling slowly, produces a grain refinement which provides for higher toughness. Unfortunately, fabrication operations on steel, such as hot and cold forming, punching, and flame cutting, affect the original microstructure. This raises the transition temperature of the steel.
(15) Welding tends to accentuate Some of the undesirable characteristics that contribute to brittle fracture. The thermal treatment resulting from welding tends to reduce the toughness of the steel or to raise its transition temperature in the heat� affected zone. The monolithic structure of a weldment means that more energy is locked up and there is the possibility of residual stresses which may be at yield point levels. The monolithic structure also causes stresses and strains to be transmitted throughout the entire weldment, and defects in weld joints can be the nucleus for the notch or crack that will initiate fracture.
(16) Brittle fractures can be reduced in weldments by selecting steels that have sufficient toughness at the service temperatures. The transition temperature should be below the service temperature to which the weldment will be subjected. Heat treatment, normalizing, or any method of reducing locked-up stresses will reduce the triaxial yield strength stresses within the weldment. Design notches must be eliminated and notches resulting from poor workmanship must not occur. Internal cracks within the welds and unfused root areas must be eliminated.
b. Fatigue Failure. Structures sometimes fail at nominal stresses considerably below the tensile strength of the materials involved. The materials involved were ductile in the normal tensile tests, but the failures generally exhibited little or no ductility. Most of these failures development after the structure had been subjected to a large number of cycles of loading. This type of failure is called a fatigue failure.
(1) Fatigue failure is the formation and development of a crack by repeated or fluctuating loading. When sudden failure occurs, it is because the crack has increased enough to reduce the load-carrying capacity of the part. Fatigue cracks may exist in some weldments, but they will not fail until the load-carrying area is sufficiently reduced. Repeated loading causes progressive enlargement of the fatigue cracks through the material. The rate at which the fatigue crack increases depends upon the type and intensity of stress as well as other factors involving the design, the rate of loading, and type of material.
(2) The fracture surface of a fatigue failure is generally smooth and frequently shins concentric rings or areas spreading from the point where the crack initiated. These rings show the propagation of the crack, which might be related to periods of high stress followed by periods of inactivity. The fracture surface also tends to become rougher as the rate of propagation of the crack increases. Figure 6-57 shows the characteristic fatigue failure surface.
(3) Many structures are designed to a permissible static stress based on the yield point of the material in use and the safety factor that has been selected. This is based on statically loaded structures, the stress of which remains relatively constant. Many structures, however, are subject to other than static loads in service. These changes may range from simple cyclic fluctuations to completely random variations. In this type of loading, the structure must be designed for dynamic loading and considered with respect to fatigue stresses.
(4) The varying loads involved with fatigue stresses can be categorized in different manners. These can be alternating cycles from tension to compression, or pulsating loads with pulses from zero load to a maximum tensile load, or from a zero load to a compressive load, or loads can be high and rise higher, either tensile or compressive. In addition to the loadings, it is important to consider the number of times the weldment is subjected to the cyclic loading. For practical purposes, loading is considers in millions of cycles. Fatigue is a cumulative process and its effect is in no way healed during periods of inactivity. Testing machines are available for loading metal specimens to millions of cycles. The results are plotted on stress vs. cycle curves, which show the relationship between the stress range and the number of cycles for the particular stress used. Fatigue test specimens are machined and polished, and the results obtained on such a specimen may not correlate with actual service life of a weldment. It is therefore important to determine those factors which adversely affect the fatigue life of a weldment.
(5) The possibility of a fatigue failure depends on four factors: the material used, the number of loading cycles, the stress level and nature of stress variations, and total design and design details. The last factor is controllable in the design and manufacture of the weldment. Weld joints can be designed for uniform stress distribution utilizing a full-penetration weld, but in other cases, joints may not have full penetration because of an unfused root. This prohibits uniform stress distribution. Even with a full-penetration weld, if the reinforcement is excessive, a portion of the stress will flow through the reinforced area and will not be uniformly distributed. Welds designed for full penetration might not have complete penetration because of workmanship factors such as cracks, slag inclusions, and incomplete penetration, and therefore contain a stress concentration. One reason fatigue failures in welded structures occur is because the welded design can introduce more severe stress concentrations than other types of design. The weld defects mentioned previously, including excessive reinforcement, undercut, or negative reinforcement, will contribute to the stress concentration factor. A weld also forms an integral part of the structure, and when parts are attached by welding, they may produce sudden changes of section which contribute to stress concentrations under normal types of loading. Anything that can be done to smooth out the stress flow in the weldment will reduce stress concentrations and make the weldment less subject to fatigue failure. Total design with this in mind and careful workmanship will help to eliminate this type of problem.
c. Lamellar Tearing. Lamellar tearing is a cracking which occurs beneath welds, and is found in rolled steel plate weldments. The tearing always lies within the base metal, usually outside the heat-affected zone and generally parallel to the weld fusion boundary. This type of cracking has been found in corner joints where the shrinkage across the weld tended to open up in a manner similar to lamination of plate steel. In these cases, the lamination type crack is removed and replaced with weld metal. Before the advent of ultrasonic testing, this type of failure was probably occurring and was not found. It is only when welds subjected the base metal to tensile loads in the z, or through, direction of the rolled steel that the problem is encountered. For many years, the lower strength of rolled steel in the through direction was recognized and the structural code prohibited z-directional tensile loads on steel spacer plates. Figure 6-58 shows how lamellar tearing will come to the surface of the metal. Figure 6-59, shining a tee joint, is a more common type of lamellar tearing, which is much more difficult to find. In this case, the crack does not cane to the surface and is under the weld. This type of crack can only be found with ultrasonic testing or if failure occurs, the section can actually come out and separate from the main piece of metal.
(1) Three conditions must occur to cause lamellar tearing. These are strains in the through direction of the plate caused by weld metal shrinkage in the joint and increased by residual stresses and by loading; stress through the joint across the plate thickness or in the z direction due to weld orientation in which the fusion line beneath the weld is roughly parallel to the lamellar separation; and poor ductility of the material in the z, or through, direction.
(2) Lamellar tearing can occur during flame-cutting operations and also in cold-shearing operations. It is primarily the low strength of the material in the z, or through, direction that contributes to the problem. A stress placed in the z direction triggers the tearing. The thermal heating and stresses resulting from weld shrinkage create the fracture. Lamellar tearing is not associated with the under-bead hydrogen cracking problem. It can occur soon after the weld has been made, but on occasion will occur at a period months later. Also, the tears are under the heat-affected zone, and are more apt to occur in thicker materials and in higher-strength materials.
(3) Only a very small percentage of steel plates are susceptible to lamellar tearing. There are only certain plates where the concentration of inclusions are coupled with the unfavorable shape and type that present the risk of tearing. These conditions rarely occur with the other two factors mentioned previously. In general, three situations must occur in combination: structural restraint, joint design, and the condition of the steel.
(4) Joint details can be changed to avoid the possibility of lamellar tearing. In tee joints, double-fillet weld joints are less susceptible than fullpenetration welds. Balanced welds on both sides of the joint present less risk of lamellar tearing than large single-sided welds. corner joints are common in box columns. Lamellar tearing at the corner joints is readily detected on the exposed edge of the plate. Lamellar tearing can be overcome in corner joints by placing the bevel for the joint on the edge of the plate that would exhibit the tearing rather than on the other plate. This is shown by figure 6-60. Butt joints rarely are a problem with respect to lamellar tearing since the shrinkage of the weld does not set up a tensile stress in the thickness direction of the plates.
(5) Arc welding processes having higher heat input are less likely to create lamellar tearing. This may be because of the fewer number of applications of heat and the lesser number of shrinkage cycles involved in making a weld. Deposited filler metal with lower yield strength and high ductility also reduces the possibility of lamellar tearing. Preheat and stress relief heat treatment are not specifically advantageous with respect to lamellar tearing. The buttering technique of laying one or more layers of low strength, high-ductility weld metal deposit on the surface of the plate stressed in the z direction will reduce the possibility of lamellar tearing. This is an extreme solution and should only be used as a last resort. By observing the design factors mentioned above, the lamellar tearing problem is reduced.
d. Stress Corrosion Cracking. Stress corrosion cracking and delayed cracking due to hydrogen embrittlement can both occur when the weldment is subjected to the type of environment that accentuates this problem.
(1) Delayed cracking is caused by hydrogen absorbed in the base metal or weld metal at high temperatures. Liquid or molten steel will absorb large quantities of hydrogen. As the metal solidifies, it cannot retain all of the hydrogen and is forced out of solution. The hydrogen coming out of the solution sets up high stresses, and if enough hydrogen is present, it will cause cracking in the weld or the heat-affected zone. These cracks develop over a period of time after the weld is completed. The concentration of hydrogen and the stresses resulting from it when coupled with residual stresses promote cracking. Cracking will be accelerated if the weldment is subjected to thermal stresses due to repeated heating and cooling.
(2) Stress corrosion cracking in steels is sometimes called caustic embrittlement. This type of cracking takes place when hot concentrated caustic solutions are in contact with steel that is stressed in tension to a relatively high level. The high level of tension stresses can be created by loading or by high residual stresses. Stress corrosion cracking will occur if the concentration of the caustic solution in contact with the steel is sufficiently high and if the stress level in the weldment is sufficiently high. This situation can be reduced by reducing the stress level and the concentration of the caustic solution. Various inhibitors can be added to the solution to reduce the concentration. Close inspection must be maintained on highly stressed areas.
(3) Graphitization is another type of cracking, caused by long service life exposed to thermal cycling or repeated heating and cooling. This may cause a breakdown of carbides in the steel into small areas of graphite and iron. This formation of graphite in the edge of the heat-affected area exposed to the thermal cycling causes cracking. It will often occur in carbon steels deoxidized with aluminum. The addition of molybdenum to the steel tends to restrict graphitization, and for this reason, carbon molybdenum steels are normally used in high-temperature power plant service. These steels must be welded with filler metals of the same composition.
6-31. ARC BLOW
a. General. Arc blow is the deflection of an electric arc from its normal path due to magnetic forces. It is mainly encountered with dc welding of magnetic materials, such as steel, iron, and nickel, but can also be encountered when welding nonmagnetic materials. It will usually adversely affect appearance of the weld, cause excessive spatter, and can also impair the quality of the weld. It is often encountered when using the shielded metal arc welding process with covered electrodes. It is also a factor in semiautomatic and fully automatic arc welding processes. Direct current, flowing through the electrode and the base metal, sets up magnetic fields around the electrode, which deflect the arc from its intended path. The welding arc is usually deflected forward or backward of the direction of travel; however, it may be deflected from one side to the other. Back blow is encountered when welding toward the ground near the end of a joint or into a corner. Forward blow is encountered when welding away from the ground at the start of a joint. Arc blow can become so severe that it is impossible to make a satisfactory weld. Figure 6-61 shows the effect of ground location on magnetic arc blow.
b. When an electric current passes through an electrical conductor, it produces a magnetic flux in circles around the conductor in planes perpendicular to the conductor and with their centers in the conductor. The right-hand rule is used to determine the direction of the magnetic flux. It states that when the thumb of the right hand points in the direction in which the current flows (conventional flow) in the conductor, the fingers point in the direction of the flux. The direction of the magnetic flux produces polarity in the magnetic field, the same as the north and south poles of a permanent magnet. This magnetic field is the same as that produced by an electromagnet. The rules of magnetism, which state that like poles repel and opposite poles attract, apply in this situation. Welding current is much higher than the electrical current normally encountered. Likewise, the magnetic fields are also much stronger.
c. The welding arc is an electrical conductor and the magnetic flux is set up surrounding it in accordance with the right-hand rule. The magnetic field in the vicinity of the welding arc is the field produced by the welding current which passes through it from the electrode and to the base metal or work. This is a self-induced circular magnetic field which surrounds the arc and exerts a force on it from all sides according to the electrical-magnetic rule. As long as the magnetic field is symmetrical, there is no unbalanced magnetic force and no arc deflection. Under these conditions, the arc is parallel or in line with the centerline of the electrode and takes the shortest path to the base plate. If the symmetry of this magnetic field is disturbed, the forces on the arc are no longer equal and the arc is deflected by the strongest force.
d. The electrical-magnetic relationship is used in welding applications for magnetically moving, or oscillating, the welding arc. The gas tungsten arc is deflected by means of magnetic flux. It can be oscillated by transverse magnetic fields or be made to deflect in the direction of travel. Moving the flux field surrounding the arc and introducing an external-like polarity field roves the arc magnetically. Oscillation is obtained by reversing the external transverse field to cause it to attract the field surrounding the arc. As the self-induced field around the arc is attracted and repelled, it tends to move the arc column, which tries to maintain symmetry within its own self-induced magnetic field. Magnetic oscillation of the gas tungsten welding arc is used to widen the deposition. Arcs can also be made to rotate around the periphery of abutting pipes by means of rotating magnetic fields. Longer arcs are moved more easily than short arcs. The amount of magnetic flux to create the movement must be of the same order as the flux field surrounding the arc column. Whenever the symmetry of the field is disturbed by some other magnetic force, it will tend to move the self-induced field surrounding the arc and thus deflect the arc itself.
e. Except under the most simple conditions, the self-induced magnetic field is not symmetrical throughout the entire electric circuit and changes direction at the arc. There is always an unbalance of the magnetic field around the arc because the arc is roving and the current flow pattern through the base material is not constant. The magnetic flux will pass through a magnetic material such as steel much easier than it will pass through air, and the magnetic flux path will tend to stay within the steel and be more concentrated and stronger than in air. Welding cur-rent passes through the electrode lead, the electrode holder to the welding electrode, then through the arc into the base metal. At this point the current changes direction to pass to the work lead connection, then through the work lead back to the welding machine. This is shown by figure 6-62. At the point the arc is in contact with the work, the change of direction is relatively abrupt, and the fact that the lines of force are perpendicular to the path of the welding current creates a magnetic unbalance. The lines of force are concentrated together on the inside of the angle of the current path through the electrode and the work, and are spread out on the outside angle of this path. Consequently, the magnetic field is much stronger on the side of the arc toward the work lead connection than on the other side, which produces a force on the stronger side and deflects the arc to the left. This is toward the weaker force and is opposite the direction of the current path. The direction of this force is the same regardless of the direction of the current. If the welding current is reversed, the magnetic field is also reversed, but the direction of the magnetic force acting on the arc is always in the same direction, away from the path of the current through the work.
f. The second factor that keeps the magnetic field from being symmetrical is the fact that the arc is moving and depositing weld metal. As a weld is made joining two plates, the arc moves from one end of the joint to the other and the magnetic field in the plates will constantly change. Since the work lead is immediately under the arc and moving with the arc, the magnetic path in the work will not be concentric about the point of the arc, because the lines of force take the easiest path rather than the shortest path. Near the start end of the joint the lines of force are crowded together and will tend to stay within the steel. Toward the finish end of the joint, the lines of force will be separated since there is more area. This is shown by figure 6-63. In addition, where the weld has been made the lines of force go through steel. Where the weld is not made, the lines of force must cross the air gap or root opening. The magnetic field is more intense on the short end and the unbalance produces a force which deflects the arc to the right or toward the long end.
g. When welding with direct current, the total force tending to cause the arc to deflect is a combination of these two forces. These forces may add or subtract from each other, and at times may meet at right angles. The polarity or direction of flow of the current does not affect the direction of these forces nor the resultant force. By analyzing the path of the welding current through the electrode and into the base metal to the work lead, and analyzing the magnetic field within the base metal, it is possible to determine the resultant forces and predict the resulting arc deflection or arc blow.
h. Forward blow exists for a short time at the start of a weld, then diminishes. This is because the flux soon finds an easy path through the weld metal. Once the magnetic flux behind the arc is concentrated in the plate and the weld, the arc is influenced mainly by the flux in front of it as this flux crosses the root opening. At this point, back blow may be encountered. Back blow can occur right up to the end of the joint. As the weld approaches the end, the flux ahead of the arc becomes more crowded, increasing the back blow. Back blow can become extremely severe right at the very end of the joint.
i. The use of alternating current for welding greatly reduces the magnitude of deflection or arc blow; however, ac welding does not completely eliminate arc blow. Reduction of arc blow is reduced because the alternating current sets up other currents that tend to either neutralize the magnetic field or greatly reduce its strength. Alternating current varies between maximum value of one polarity and the maximum value of the opposite polarity. The magnetic field surrounding the alternating current conductor does the same thing. The alternating magnetic field is a roving field which induces current in any conductor through which it passes, according to the induction principle. Currents are induced in nearby conductors in a direction opposite that of the inducing current. These induced currents are called eddy currents. They produce a magnetic field of their own which tends to neutralize the magnetic field of the arc current. These currents are alternating currents of the same frequency as the arc current and are in the part of the work nearest the arc. They always flow from the opposite direction as shown by figure 6-64. When alternating current is used for welding, eddy currents are induced in the workpiece, which produce magnetic fields and reduce the intensity of the field acting on the arc. Alternating current cannot be used for all welding applications and for this reason changing from direct current to alternating current may not always be possible to eliminate or reduce arc blow.
j. Summary of Factors Causing Arc Blow.
(1) Arc blow is caused by magnetic forces. The induced magnetic forces are not symmetrical about the magnetic field surrounding the path of the welding current. The location of magnetic material with respect to the arc creates a magnetic force on the arc which acts toward the easiest magnetic path and is independent of electrode polarity. The location of the easiest magnetic path changes constantly as welding progresses; therefore, the intensity and the direction of the force changes.
(2) Welding current will take the easiest path but not always the most direct path through the work to the work lead connection. The resultant magnetic force is opposite in direction to the current from the arc to is independent of welding current polarity.
(3) Arc blow is not as severe with alternating current because the induction principle creates current flow within the base metal which creates magnetic fields that tend to neutralize the magnetic field affecting the arc.
(4) The greatest magnetic force on the arc is caused by the difference resistance of the magnetic path in then the base metal around the arc. The location of the work connection is of secondary importance, but may have an effect on reducing the total magnetic force on the arc. It is best to have the work lead connection at the starting point of the weld. This is particularly true in electroslag welding where the work lead should be connected to the starting sump. On occasion, the work lead can be changed to the opposite end of the joint. In sane cases, leads can be connected to both ends.
k. Minimizing Arc Blow.
(1) The magnetic forces acting on the arc can be modified by changing the magnetic path across the joint. This can be accomplished by runoff tabs, starting plates, large tack welds, and backing strips, as well as the welding sequence.
(2) An external magnetic field produced by an electromagnet may be effective. This can be accomplished by wrapping several turns of welding lead around the workpiece.
(3) Arc blow is usually more pronounced at the start of the weld seam. In this case, a magnetic shunt or runoff tab will reduce the blow.
(4) Use as short an arc as possible so that there is less of an arc for the magnetic forces to control.
(5). The welding fixture can be a source of arc blow; therefore, an analysis with respect to fixturing is important. The hold-down clamps and backing bars must fit closely and tightly to the work. In general, copper or nonferrous metals should be used. Magnetic structure of the fixture can affect the magnetic forces controlling the arc.
(6) Place ground connections as far as possible from the joints to welded.
(7) If to back blow is the problem, place the ground connection at the start of welding, and weld toward a heavy tack weld.
(8) If forward blow causes trouble, place the ground connection at the end of the joint to be welded.
(9) Position the electrode so that the arc force counteracts the arc blow.
(10) Reduce the welding current.
(11) Use the backstep sequence of welding.
(12) Change to ac, which may require a change in electrode classification
(13) Wrap the ground cable around the workpiece in a direction such that the magnetic field it sets up will counteract the magnetic field causing the arc blow.
(14) Another major problem can result from magnetic fields already in the base metal, particularly when the base metal has been handled by magnet lifting cranes. Residual magnetism in heavy thick plates handled by magnets can be of such magnitude that it is almost impossible to make a weld. Attempt to demagnetize the parts, wrap the part with welding leads to help overcome their effect, or stress relieve or anneal the parts.
6-32. WELD FAILURE ANALYSIS
a. General. Only rarely are there failures of welded structures, but failures of large engineered structures do occur occasionally. Catastrophic failures of major structures are usually reported whenever they occur. The results of investigations of these failures are usually reported and these reports often provide information that is helpful in avoiding future similar problems. In the same manner, there are occasional failures of noncritical welds and weldments that should also be investigated. Once the reason is determined it can then be avoided. An objective study must be made of any failure of parts or structures to determine the cause of the failure. This is done by investigating the service life, the conditions that led up to the failure, and the actual mode of the failure. An objective study of failure should utilize every bit of information available, investigate all factors that could remotely be considered, and evaluate all this information to find the reason for the failure. Failure investigation often uncovers facts that lead to changes in design, manufacturing, or operating practice, that will eliminate similar failures in the future. Failures of insignificant parts can also lead to advances in knowledge and should be done objectively, as with a large structure. Each failure and subsequent investigation will lead to changes that will assure a more reliable product in the future.
b. The following four areas of interest should be investigated to determine the cause of weld failure and the interplay of factors involved:
(1) Initial observation. The detailed study by visual inspection of the actual component that failed should be made at the failure site as quickly as possible. Photographs should be taken, preferably in color, of all parts, structures, failure surfaces, fracture texture appearance, final location of component debris, and all other factors. Witnesses to the failure should all be interviewed and all information determined from them should be recorded.
(2) Background data. Investigators should gather all information concerning specifications, drawings, component design, fabrication methods, welding procedures, weld schedules, repairs in and during manufacturing and in service, maintenance, and service use. Efforts should be made to obtain facts pertinent to all possible failure modes. Particular attention should be given to environmental details, including operating temperatures, normal service loads, overloads, cyclic loading, and abuse.
(3) Laboratory studies. Investigators should make tests to verify that the material in the failed parts actually possesses the specified composition, mechanical properties, and dimensions. Studies should also be made microscopically in those situations in which it would lead to additional information. Each failed part should be thoroughly investigated to determine what bits of information can be added to the total picture. Fracture surfaces can be extremely important. Original drawings should be obtained and marked showing failure locations, along with design stress data originally used in designing the product. Any other defects in the structure that are apparent, even though they might not have contributed to the failure, should also be noted and investigated.
(4) Failure assumptions. The investigator should list not only all positive facts and evidence that may have contributed to the failure, but also all negative responses that may be learned about the failure. It is sometimes important to know what specific things did not happen or what evidence did not appear to help determine what happened. The data should be tabulated and the actual failure should be synthesized to include all available evidence.
c. Failure cause can usually be classified in one of the following three classifications:
(1) Failure due to faulty design or misapplication of material.
(2) Failure due to improper processing or improper workmanship.
(3) Failure due to deterioration during service.
d. The following is a summary of the above three situations:
(1) Failure due to faulty design or misapplication of the material involves failure due to inadequate stress analysis, or a mistake in design such as incorrect calculations on the basis of static loading instead of dynamic or fatigue loading. Ductile failure can be caused by a load too great for the section area or the strength of the material. Brittle fracture may occur from stress risers inherent in the design, or the wrong material may have been specified for producing the part.
(2) Failures can be caused by faulty processing or poor workmanship that may be related to the design of the weld joint, or the weld joint design can be proper but the quality of the weld is substandard. The poor quality weld might include such defects as undercut, lack of fusion, or cracks. Failures can be attributed to poor fabrication practice such as the elimination of a root opening, which will contribute to incomplete penetration. There is also the possibility that the incorrect filler metal was used for welding the part that failed.
(3) Failure due to deterioration during service can cause overload, which may be difficult to determine. Normal wear and abuse to the equipment may have result-ed in reducing sections to the degree that they no longer can support the load. Corrosion due to environmental conditions and accentuated by stress concentrations will contribute to failure. In addition, there may be other types of situations such as poor maintenance, poor repair techniques involved with maintenance, and accidental conditions beyond the user�s control. The product might be exposed to an environment for which it was not designed.
e. Conclusion. Examination of catastrophic and major failures has led the welding industry to appreciate the following facts:
(1) Weldments are monolithic in character.
(2) Anything welded onto a structure will carry part of the load whether intended or not.
(3) Abrupt changes in section, either because of adding a deckhouse or removing a portion of the deck for a hatch opening, create stress concentration. Under normal loading, if the steel at the point of stress concentration is notch sensitive at the service temperature, failure can result.
6-33. OTHER WELDING PROBLEMS
a. There are two other welding problems that require some explanation and solutions. These are welding over painted surfaces and painting of welds.
CAUTION
Cutting painted surfaces with arc or flame processes should be done with caution. Demolition of old structural steel work that had been painted many times with flame-cutting or arc-cutting techniques can create health problems. Cutting through many layers of lead paint will cause an abnormally high lead concentration in the immediate area and will require special precautions such as extra ventilation or personnel protection.
b. Welding over paint is discouraged. In every code or specification, it is specifically stated that welding should be done on clean metal. In some industries, however welds are made over paint, and in other flame cutting is done on painted base metal.
(1) In the shipbuilding industry and several other industries, steel, when it is received from the steel mill, is shot blasted, given a coating of prime paint, and then stored outdoors. Painting is done to preserve the steel during storage, and to identify it. In sane shipyards a different color paint is used for different classes of steel. When this practice is used, every effort should be made to obtain a prime paint that is compatible with welding.
(2) There are at least three factors involved with the success of the weld when welding over painted surfaces: the compatibility of the paint with welding; the dryness of the paint; and the paint film thickness.
(3) Paint compatibility varies according to the composition of the paint. Certain paints contain large amounts of aluminum or titanium dioxide, which are usually compatible with welding. Other paints may contain zinc, lead, vinyls, and other hydrocarbons, and are not compatible with welding. The paint manufacturer or supplier should be consulted. Anything that contributes to deoxidizing the weld such as aluminum, silicon, or titanium will generally be compatible. Anything that is a harmful ingredient such as lead, zinc, and hydrocarbons will be detrimental. The fillet break test can be used to determine compatibility. The surfaces should be painted with the paint under consideration. The normal paint film thickness should be used, and the paint must be dry.
(4) The fillet break test should be run using the proposed welding procedure over the painted surface. It should be broken and the weld examined. If the weld breaks at the interface of the plate with the paint it is obvious that the paint is not compatible with the weld.
(5) The dryness of the paint should be considered. Many paints employ an oil base which is a hydrocarbon. These paints dry slowly, since it takes a considerable length of time for the hydrocarbons to evaporate. If welding is done before the paint is dry, hydrogen will be in the arc atmosphere and can contribute to underbead cracking. The paint will also cause porosity if there is sufficient oil present. Water based paints should also be dry prior to welding.
(6) The thickness of the paint film is another important factor. Some paints may be compatible if the thickness of the film is a maximum of 3 to 4 mm. If the paint film thicknesses are double that amount, such as occurs at an overlap area, there is the possibility of weld porosity. Paint films that are to be welded over should be of the minimum thickness possible.
(7) Tests should be run with the dry maximum film thickness to be used with the various types of paints to determine which paint has the least harmful effects on the weld deposit.
c. Painting over welds is also a problem. The success of any paint film depends on its adherence to the base metal and the weld, which is influenced by surface deposits left on the weld and adjacent to it. The metallurgical factors of the weld bead and the smoothness of the weld are of minor importance with regard to the success of the paint. Paint failure occurs when the weld and the immediate area are not properly cleaned prior to painting. Deterioration of the paint over the weld also seems to be dependent upon the amount of spatter present. Spatter on or adjacent to the weld leads to rusting of the base material under the paint. It seems that the paint does not completely adhere to spatter and some spatter does fall off in time, leaving bare metal spots in the paint coating.
CAUTION
Aluminum and aluminum alloys should not be cleaned with caustic soda or cleaners having a pH above 10, as they may react chemically. Other nonferrous metals should be investigated for reactivity prior to cleaning.
(1) The success of the paint job can be insured by observing both preweld and postweld treatment. Preweld treatment found most effective is to use antispatter compounds, as well as cleaning the weld area, before welding. The antispatter compound extends the paint life because of the reduction of spatter. The antispatter compound must be compatible with the paint to be used.
(2) Postweld treatment for insuring paint film success consists of mechanical and chemical cleaning. Mechanical cleaning methods can consist of hand chipping and wire brushing, power wire brushing, or sand or grit blasting. Sand or grit blasting is the most effective mechanical cleaning method. If the weldment is furnace stress relieved and then grit blasted, it is prepared for painting. When sand or grit blasting cannot be used, power wire brushing is the next most effective method. In addition to mechanical cleaning, chemical bath washing is also recommended. Slag coverings on weld deposits must be thoroughly removed from the surface of the weld and from the adjacent base metal. Different types of coatings create more or less problems in their removal and also with respect to paint adherence. Weld slag of many electrodes is alkaline in nature and for this reason must be neutralized to avoid chemical reactions with the paint, which will cause the paint to loosen and deteriorate. For this reason, the weld should be scrubbed with water, which will usually remove the residual coating slag and smoke film from the weld. If a small amount of phosphoric acid up to a 5% solution is used, it will be more effective in neutralizing and removing the slag. It must be followed by a water rinse. If water only is used, it is advisable to add small amounts of phosphate or chromate inhibitors to the water to avoid rusting, which might otherwise occur.
(3) It has been found that the method of applying paint is not an important factor in determining the life of the paint over welds. The type of paint employed must be suitable for coating metals and for the service intended.
(4) Successful paint jobs over welds can be obtained by observing the following: minimize weld spatter using a compatible anti-spatter compound; mechanically clean the weld and adjacent area; and wash the weld area with a neutralizing bath and rinse.

